Descargar la presentación
La descarga está en progreso. Por favor, espere

1
Deteccion de Humo por muestreo de Aire
VESDA® Deteccion de Humo por muestreo de Aire Ing. Edgar Nájera Palacios

2
VSC (VESDA System Configuration)
Ask them to be back in ten minutes, but expect the session to start in about 15 minutes. As soon as they start out of the door for the break advance to the next slide.

3
VSC Software Even with the VLF, there is only so much that can be done simply by looking at the display. The VSC software is the latest VESDA System Configuration software and is a powerful tool for troubleshooting VESDA products. The VSC software is the next generation of V-config pro and is available for download at (VSM4???)
")
4
VSC Software VLF-250, VLF-500 VLC-500 VEU, VLP, VLS, VLC-505 VLI Even with the VLF, there is only so much that can be done simply by looking at the display. The VSC software is the latest VESDA System Configuration software and is a powerful tool for troubleshooting VESDA products. The VSC software is the next generation of V-config pro and is available for download at (VSM4???)
")
5
VESDA Laser Industrial (VLI) VESDA Laser SCANNER (VLS)
VSC Software VESDA E (VEU) VESDA Laser Industrial (VLI) VESDA Laser SCANNER (VLS) VESDA Laser PLUS (VLP) VESDA Laser COMPACT (VLC) DST = 1451 ADM = 1413 USER = 1111 VESDA Laser FOCUS 250 / 500 DST = 7244 Even with the VLF, there is only so much that can be done simply by looking at the display. The VSC software is the latest VESDA System Configuration software and is a powerful tool for troubleshooting VESDA products. The VSC software is the next generation of V-config pro and is available for download at (VSM4???)
 VESDA Laser Industrial (VLI) VESDA Laser SCANNER (VLS) VESDA Laser PLUS (VLP) VESDA Laser COMPACT (VLC) DST = ADM = USER = VESDA Laser FOCUS 250 / 500. DST = Even with the VLF, there is only so much that can be done simply by looking at the display. The VSC software is the latest VESDA System Configuration software and is a powerful tool for troubleshooting VESDA products. The VSC software is the next generation of V-config pro and is available for download at (VSM4 )")
6
HLI (VHX-0200) High Level Interface
VSC Software HLI (VHX-0200) High Level Interface Usada para configuracion de los detectores VLP, VLS y VLC-505 VN Even with the VLF, there is only so much that can be done simply by looking at the display. The VSC software is the latest VESDA System Configuration software and is a powerful tool for troubleshooting VESDA products. The VSC software is the next generation of V-config pro and is available for download at (VSM4???)
 High Level Interface. Usada para configuracion de los detectores VLP, VLS y VLC-505 VN. Even with the VLF, there is only so much that can be done simply by looking at the display. The VSC software is the latest VESDA System Configuration software and is a powerful tool for troubleshooting VESDA products. The VSC software is the next generation of V-config pro and is available for download at (VSM4 )")
7
VSC Software – Event Log
An important troubleshooting tool within VSC is the Event Log. To view the event log, click on the detector within the device tree for which you want to retrieve the event log, shown here next to the red arrow.

8
VSC Software – Event Log
Next go up to view, and click on Event Log.

9
VSC Software – Event Log
A window pops up that allows the user to filter what event types are to be included in the event log. Event types consist of Alarms, Troubles, User Actions and smoke value changes. User actions consist of logging on and setting parameters such as smoke thresholds or filter service interval. A value change event is a change in the smoke level the detector sees. The user can control how much smoke change is required for the detector to log an event – this parameter is called significant change, and the default setting is percent obscuration per foot.

10
VSC Software – Event Log
This is an event log from VSC. Just like the active event list, troubles show up as yellow, alarm events show up as orange and red, disabled detectors show up blue, and all other events show up white. Once retrieved, the event log may be sorted by any of the headings by simply clicking on the heading. It useful to sort the events by Time & Date, as well as by fault type. Sorting by fault type allows the user to easily discover patterns of when any faults or unwanted alarms that may be occurring within the facility.

11
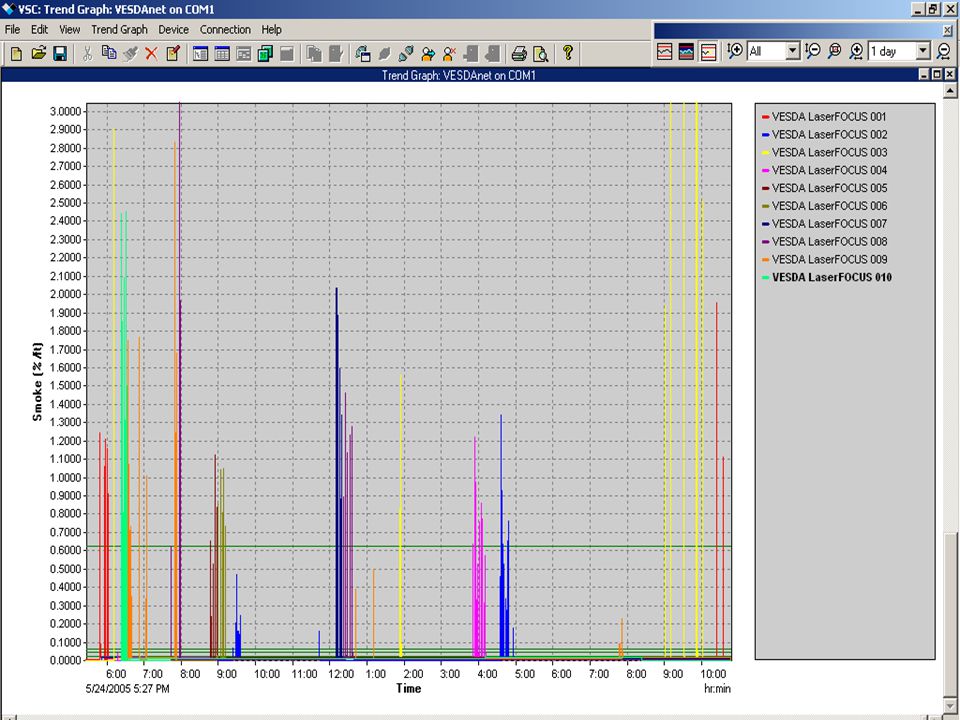
VSC Software – Gráfica de Humo
The smoke trend is another powerful troubleshooting tool for looking at smoke events, unwanted alarms, and elevated background levels in challenging environments. To view the graphical smoke trend, click on the detector you wish to analyse, then click on view, then Trend Graph, as shown.

12
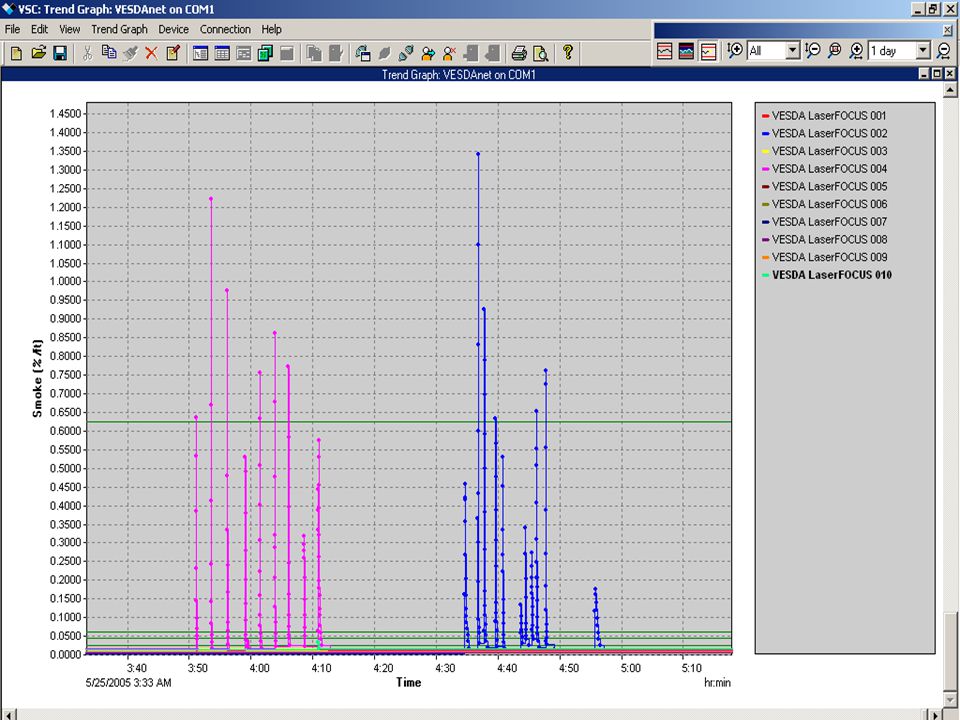
VSC Software – Gráfica de Humo
In this example, we have the classic industrial environment where the elevated ambient background level exists during operational hours. In this view I have zoomed in to see four days of operation. Each elevated plateau occurs during daily operation where there is a high level of background activity. There is limited overnight, so each night the background ambient level drops. A solution in this case is to use the two separate alarm thresholds sets to provide more sensitive settings during the night time hours, and less sensitive settings during the day while the elevated background is present. A manual switch wired to the General Purpose Input of the VESDA detector may be used to switch from Alarm threshold set #1 to Alarm threshold set #2. Alternatively, the detectors may be programmed to switch alarm threshold sets automatically at a specific time each day.

13
Ejercicio de Programación - VSC
Comunicarse con el VESDA Ingresar password de DISTR Configurar Fecha y Hora en curso Configurar Unidades a Metric y grados C Observar Flujo de Aire Normalizar detector al 100% Lograr lectura de grafico de toma de muestras de ambiente cada 15 seg Configurar Umbrales de humo diurnos y nocturnos en: Fuego 2 = 1.5 %/m Fuego 1 = 0.1 %/m Acción = 0.08 %/m Alerta = 0.04%/m Guardar el Historico de 1 mes Observar historico de grafico Quitar latch de alarma y falla Prueba real de humo

14
Antes de la Puesta en Servicio (fuera del sitio)
Inspeccione visualmente la red de tubería de muestreo y confirme que la instalación esté correcta Anote el # de serie de cada uno de los dispositivos VESCA (detectores, pantallas y módulos de relevador remotos).
.")
15
Antes de la Puesta en Servicio (fuera del sitio)
Cómo encontrar el # de serie en los dispositivos

16
Antes de la Puesta en Servicio (fuera del sitio)
Revise que se haya quitado la tapa de escape de todos los detectores Revise que el cable de poder y el alambrado VESDAnet estén bien sujetos y energice el sistema VESDA Revisión preliminar del sistema Todos los dispositivos se comunican

17
Programación del Sistema VESDA

18
Configurar Hora y Fecha

19
Configurar Hora y Fecha

20
Configurar Unidades

21
Configurar Unidades

22
Programación del Sistema VESDA
Asignar cada uno de los detectores VESDA a una zona y ubicación apropiadas Asignar las pantallas y los relés remotos a las zonas de los y ubicaciones apropiadas de los detectores

23
Programación del Sistema VESDA

24
Programación del Sistema VESDA

25
Programación del Sistema VESDA

26
Programación del Sistema VESDA

27
Programación del Sistema VESDA

28
Programación del Sistema VESDA
Aceptar las calibraciones por default de la fábrica Borra las fallas 12, 30, 31, 33, 34, 35, 38, 57, 68 y 72

29
Programación del Sistema VESDA
Programar qué tubos de Muestreo de Aire se van a usar (tubos 1-4, izquierda a derecha) Calibrar velocidad del aspirador 1234
 Calibrar velocidad del aspirador")
30
Normalizar el Detector

31
Normalizar el Detector
Durante los 11 minutos que dura la normalización (VLP, VLS, VLC), el aspirador automáticamente se apaga durante 5 minutos. VLF se normaliza instantáneamente.
, el aspirador automáticamente se apaga durante 5 minutos. VLF se normaliza instantáneamente.")
32
Normalizar el Detector
Una vez normalizado, se establece un punto de referencia para las fallas de los flujos de aire. Normalmente un 100% por cada tubo.

33
Programación del Sistema VESDA
Para establecer los umbrales de humo Calibración Manual: Por lo general, los umbrales de alarma están ya especificados y se pueden calibrar manualmente Alerta – por lo general se calibra en aproximadamente veces el nivel de humo del fondo Auto-aprendizaje: Monitorea los niveles de humo del fondo actuales de una zona dada. Automáticamente calibra los umbrales de alarma utilizando la información recabada. No menos que 25 horas (15 minutos, mínimo, 15 días, máximo)
")
34
Calibrar los Umbrales de Humo

35
Calibrar los Umbrales de Humo
Tendencia Gráfica del Humo: Historia del detector Usar como guía para calibrar umbrales

36
Prueba del Equipo Cronómetro Humo enlatado Definir el simulacro Software VSC Interfaz de nivel alto VHX-0200 Manómetro Digital (opcional) Radios de dos vías (opcional)
 Radios de dos vías (opcional)")
37
Método de Prueba Métodos de Prueba Recomendados
Humo enlatado enumerado en la lista de UL Rociar humo en el orificio más lejano (Ventilación del extremo) del detector. Utilizando un cronómetro, mida el tiempo que le toma al detector responder al incremento de humo. Manómetro Digital Para revisar el flujo de aire por los orificios de muestreo durante la prueba de seguimiento, utilice un manómetro digital para medir las lecturas de presión.
 del detector. Utilizando un cronómetro, mida el tiempo que le toma al detector responder al incremento de humo. Manómetro Digital. Para revisar el flujo de aire por los orificios de muestreo durante la prueba de seguimiento, utilice un manómetro digital para medir las lecturas de presión.")
38
Método de Prueba Recomendado: Instrumentos Dwyer: Manómetro digital de mano (Modelo FM) Disponible con Grainger
 Disponible con Grainger.")
41
Formas para la Puesta en Servicio
Contenido: Registro de la Instalación Anexos (Aspire2 / VSC) Configuración del Módulo de la Pantalla Información sobre el dispositivo Definición de las zonas Configuración del Relé Resultados de la Prueba de Presión Resultados de la Prueba de Humo Nota: Al iluminar un detector en un árbol de dispositivos (VSC) y seleccionar “Definir impresión” se imprimirá toda la información requerida para este dispositivo.
 Configuración del Módulo de la Pantalla. Información sobre el dispositivo. Definición de las zonas. Configuración del Relé. Resultados de la Prueba de Presión. Resultados de la Prueba de Humo. Nota: Al iluminar un detector en un árbol de dispositivos (VSC) y seleccionar Definir impresión se imprimirá toda la información requerida para este dispositivo.")
42
Revisiones finales Que no haya fallas en VESDAnet Diagnóstico del detector revisado Diagnóstico de la pantalla revisado Relés de prueba revisados Probar la fuente de poder de respaldo

43
Entrega Se deberán entregar copias del documento de la Puesta en servicio a: El distribuidor de Vision El contratista responsable de la instalación del sistema El diseñador del sistema El usuario final del sistema La Autoridad que Tenga Jurisdicción

44
Configurador del Sistema VESDA Generalidades (VSC)
")
45
Demostración del Producto
Conexión a una red Configuración de una red fuera de línea Configuración del detector Administración de la cuadrícula Ver Windows Estado View Bitácora de eventos Lista de Eventos Activos Gráfica de tendencias Ayuda VSC Fusionar y Comparar Reportes

46
Ejercicio de Programación - VSC
Configurar Fecha y Hora en curso Configurar Unidades a unidades estadounidenses Configurar Número de zona del detector y de la pantalla = 5 Configurar Tubo del detector en uso Normalizar detector Configurar Umbrales de humo diurnos y nocturnos en: Fuego 2 = 1.5 %/pie Fuego 1 = 0.03 %/ pie Acción = 0.02 %/ pie Alerta = 0.01%/ pie

47
Ejercicio de Programación - VSC
Asignar Aislar, Falla Menor y Falla Urgente al Relé 3 del detector. Deshabilitar en la Pantalla los botones: Aislar y Resetear Reconocer las definiciones por default seleccionando Default OK para el detector.

48
Gracias

Presentaciones similares


 Curso creado por : Libro de Clases Electrónico (LCE)>")


 ACTUALIZADO 17-02-2014.>")