Descargar la presentación
La descarga está en progreso. Por favor, espere

1
Desinfección y Esterilización
Bacteriología y Micología Veterinaria. M. en C. Gerardo Castillo FMVZ-BUAP Otoño 2012

2
Definiciones Bioseguridad: Termino utilizado para referirse a los principios, técnica y practica aplicadas con el fin de evitar la exposición no intencional a patógenos y toxinas, o su liberación accidental.

3
Definiciones Antimicrobiano – Agente que mata los microorganismos o suprime su crecimiento y proliferación. Antiséptico – Sustancia que inhibe el crecimiento y el desarrollo de microorganismos pero no necesariamente los mata. Los antisépticos suelen aplicarse a las superficies corporales.

4
Definiciones Biocida – Término general para cualquier agente que mate organismos. Descontaminación – Cualquier proceso utilizado para eliminar o matar microorganismos. También se utiliza para referirse a la eliminación o neutralización de sustancias químicas peligrosas y materiales radioactivos.

5
Definiciones Desinfección – Medio físico o químico de matar microorganismos, pero no necesariamente esporas. Desinfectante – Sustancia o mezcla de sustancias químicas utilizada para matar microorganismos, pero no necesariamente esporas. Los desinfectantes suelen aplicarse a superficies u objetos inanimados.

6
Definiciones Esporicida – Sustancia o mezcla de sustancias químicas utilizadas para matar microorganismos y esporas. Esterilización – Proceso que mata o elimina todas las clases de microorganismos y esporas.

7
Definiciones Germicida químico – Sustancia o mezcla de sustancias químicas utilizada para matar microorganismos. Microbicida – Sustancia o mezcla de sustancias químicas que mata microorganismos. Este término se utiliza a menudo en lugar de «biocida», «germicida químico» o «antimicrobiano».

8
Limpieza del material del laboratorio
Eliminación de suciedad, materia orgánica y manchas La suciedad puede interferir con la acción de los descontaminantes Deben utilizarse materiales que sean químicamente compatibles

9
Control de microorganismos por medios físicos- Calor
Celulas vegetativas Esporas Levaduras 5 min a 50-60º C 5 min a 70-80º C Mohos 30 min a 62º C 30 min a 80º C Bacterias 10 min a 60-70º C de 2 min a 800 min a 100º C Virus min a 121º C

10
Esterilización por calor húmedo

13
Hornos para esterilización por calor seco

14
Esterilización por calor
Pasteurización 72º C durante 15 segundos Ultra pasteurización 150º C durante 1-3 segundos Esterilización por calor seco 170º C durante 2-12 horas

16
Esterilización por filtración
Para reducir la población bacteriana en materiales termosensibles Filtros de membrana, de acetato de celulosa, de 0.2 µm Para productos farmacéuticos, medios de cultivo, antibióticos

18
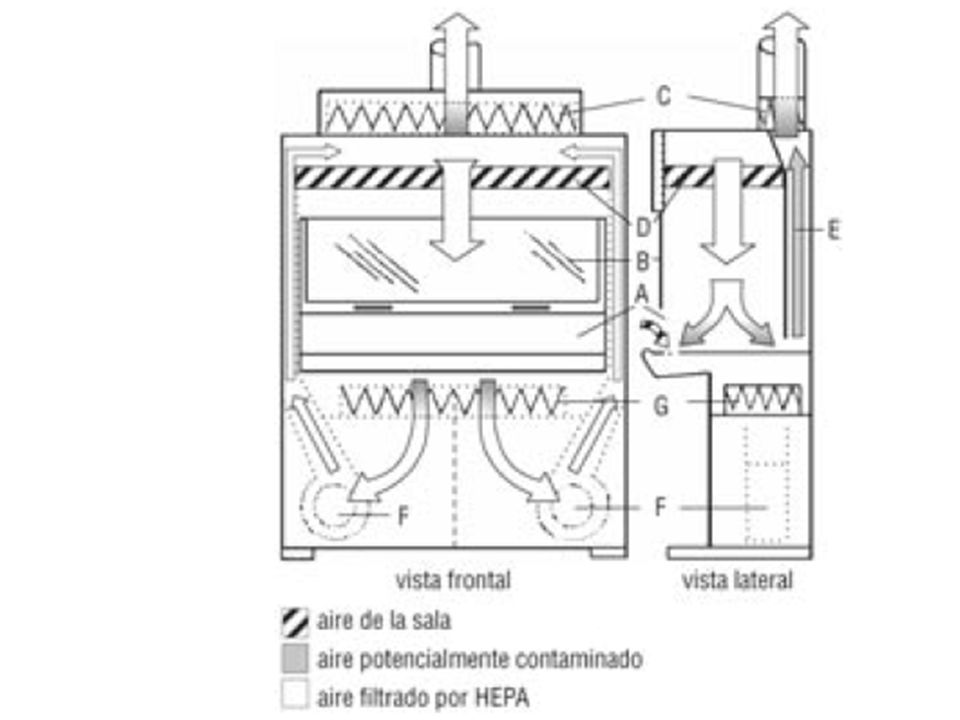
Campanas de flujo laminar
Campanas de seguridad biológica BS 1 y BS2 Filtros HEPA (alta eficiencia de retención de partículas de aire) Partículas mayores de 0.3 µm
 Partículas mayores de 0.3 µm.")
20
Bacterias Hongos Virus Parasitos Grupo de riesgo 1 Grupo de riesgo 2 B. bronchiseptica, C. botulinum, L.interrogans, M. tuberculosis, S.enterica, Pasteurella sp C. albicans. M. canis, Trichophyton spp, A. fumigatus Phlebovirus, Coronavirus canino, Virus de la hepatitis B, Parvovirus Giardia spp, Leishmania spp Grupo de riesgo 3 B.anthracis, Brucella spp, Rickettsia spp, Y. pestis H. capsulatum Hantavirus, Lentivirus, Rhabdoviridae, genero Lyssavirus Grupo de riesgo 4 Virus de Marbug, Virus Ebola

25
Esterilización por radiación
Se utiliza la luz UV de 260 nm Se colocan en las campanas de flujo laminar, previamente a utilizarlas No atraviesan el cristal, y su eficiencia es afectada por suciedad y agua

27
Dilución empleada (g/litro)
Microorganismo inactivado Características principales Posibles aplicaciones Virus lipidicos Bacterias vegetativas Virus no lipidicos Endosporas Corrosivo Residuos Inactivado m. organica Irrita piel Toxico Superficies de trabajo Cristalería sucia Descontaminación Líquidos desecho Compuestos de amonio cuaternario 1-20 + Compuestos fenolicos 10-50 * Hipocloritos 5-10 Yodoforos Alcohol etílico Alcohol isopropilico Formaldehido 2-80 Glutaraldehido 20

28
Características de un agente desinfectante ideal
Económico Ecológico De fácil aplicación Animated pointer and light-up text (Advanced) To reproduce the background effects on this slide, do the following: On the Home tab, in the Slides group, click Layout, and then click Blank. Right-click the slide background area, and then click Format Background. In the Format Background dialog box, click Fill in the left pane, select Solid fill in the right pane, and select White, Background 1 (first row, first option from the left). To reproduce the rectangle on this slide, do the following: On the Home tab, in the Drawing group, click Shapes, and then under Rectangles click Rounded Rectangle (second option from the left). On the slide, drag to draw a rounded rectangle. Select the rectangle. Drag the yellow diamond adjustment handle to the left to decrease the amount of rounding on the corners. With the rounded rectangle still selected, under Drawing Tools, on the Format tab, in the Size group, do the following: In the Shape Height box, enter 3.5”. In the Shape Width box, enter 0.25”. Under Drawing Tools, on the Format tab, in the bottom right corner of the Shape Styles group, click the Format Shape dialog box launcher. In the Format Shape dialog box, click Fill in the left pane. In the Fill pane, select Solid fill, click the button next to Color, and then under Theme Colors click White, Background 1, Darker 15% (third row, first option from the left). Also in the Format Shape dialog box, click Line Color in the left pane. In the Line Color pane, select No line. Also in the Format Shape dialog box, click Shadow in the left pane. In the Shadow pane, click the button next to Presets, under Outer select Offset Bottom (first row, second option from the left), and then do the following: In the Transparency box, enter 0%. In the Size box, enter 100%. In the Blur box, enter 8.5 pt. In the Angle box, enter 90°. In the Distance box, enter 1 pt. Also in the Format Shape dialog box, click 3-D Format in the left pane. In the 3-D Format tab, do the following: Under Bevel, click the button next to Top, and then under Bevel click Circle (first row, first option from the left). Next to Top, in the Width box, enter 5 pt, and in the Height box, enter 5 pt. Under Surface, click the button next to Material, and then under Standard click Matte (first row, first option from the left). Click the button next to Lighting, and then under Neutral click Soft (first row, third option from the left). On the slide, select the rounded rectangle. On the Home tab, in the Clipboard group, click the arrow to the right of Copy, and then click Duplicate. Select the duplicate rectangle. On the Home tab, in the Drawing group, do the following: Click the arrow next to Shape Fill, and then click No Fill. Click the arrow next to Shape Outline, and then click No Outline. Drag the second rectangle above the first rectangle until the lower edge overlays the top edge of the first rectangle. (Note: When the spinning animation effect is created later for these rectangles, the spin will center where the edges of the rectangles meet.) Press and hold CTRL, and then select both rectangles. On the Home tab, in the Drawing group, click Arrange, and do the following: Point to Align, and then click Align Selected Objects. Point to Align, and then click Align Center. Click Group. On the slide, drag the group until it is centered horizontally on the left edge of the slide (straddling the edge). On the Home tab, in the Drawing group, click Arrange, point to Align, and then do the following: Click Align to Slide. Click Align Middle. To reproduce the dashed arc on this slide, do the following: On the Home tab, in the Drawing group, click Shapes, and then under Basic Shapes click Arc (third row, 12th option from the left). On the slide, drag to draw an arc. Select the arc. Under Drawing Tools, on the Format tab, in the Size group, do the following: In the Shape Height box, enter 7.5”. In the Shape Width box, enter 7.5”. With the arc still selected, on the Home tab, in the Drawing group, click the arrow next to Shape Outline and then do the following: Under Theme Colors, click White, Background 1, Darker 15% (third row, first option from the left). Point to Dashes, and then click Dash (fourth option from the top). On the slide, drag the yellow diamond adjustment handle on the right side of the arc to the bottom of the arc to create a half circle. Drag the arc until the yellow diamond adjustment handles are on the left edge of the slide. With the arc still selected, on the Home tab, in the Drawing group, click the arrow under Arrange, point to Align, and then do the following: To reproduce the half circle on this slide, do the following: On the slide, select the arc. On the Home tab, in the Clipboard group, click the arrow to the right of Copy, and then click Duplicate. Select the duplicate arc. Under Drawing Tools, on the Format tab, in the Size group, do the following: In the Shape Height box, enter 3.33”. In the Shape Width box, enter 3.33”. With the second arc still selected, under Drawing Tools, on the Format tab, in the Shape Styles group, click the arrow next to Shape Fill, and then under Theme Colors click White, Background 1, Darker 5% (second row, first option from the left). Under Drawing Tools, on the Format tab, in the Shape Styles group, click the arrow next to Shape Outline, and then click No Outline. Under Drawing Tools, on the Format tab, in the Shape Styles group, click Shape Effects, point to Shadow, and then click Shadow Options. In the Format Shape dialog box, click Shadow in the left pane. In the Shadow pane, click the button next to Presets , under Inner click Inside Right (second row, third option from the left), and then do the following: In the Transparency box, enter 86%. In the Blur box, enter 24 pt. In the Angle box, enter 315°. In the Distance box, enter 4 pt. On the slide, drag the second arc until the yellow diamond adjustment handles are on the left edge of the slide. On the Home tab, in the Drawing group, click Arrange, and then do the following: Point to Align, and then click Align to Slide. Point to Align, and then click Align Middle. Click Send to Back. To reproduce the button shapes on this slide, do the following: On the Home tab, in the Drawing group, click Shapes, and then under Basic Shapes click Oval (first row, second option from the left). On the slide, drag to draw an oval. Select the oval. Under Drawing Tools, on the Format tab, in the Size group, do the following: In the Shape Height box, enter 0.34”. In the Shape Width box, enter 0.34”. Under Drawing Tools, on the Format tab, in the Shape Styles group, click More, and then click Light 1 Outline, Colored Fill – Olive Green, Accent 3 (third row, first option from the left). Under Drawing Tools, on the Format tab, in the bottom right corner of the Shape Styles group, click the Format Shape dialog box launcher. In the Format Shape dialog box, click Fill in the left pane. In the Fill pane, select Solid Fill. Click the button next to Color, and then under Theme Colors click Olive Green, Accent 3, Lighter 80° (second row, seventh option from the left). Also in the Format Shape dialog box, click Shadow in the left pane. In the Shadow pane, click the button next to Presets, under Outer click Offset Bottom (first row, second option from the left), and then do the following: Also in the Format Shape dialog box, click 3-D Format in the left pane, and then do the following in the 3-D Format pane: Under Bevel, click the button next to Top, and then under Bevel click Art Deco (third row, fourth option from the left). Next to Top, in the Width box, enter 5 pt, and in the Height box, enter 5 pt. Under Contour, click the button next to Color, and then under Theme Colors click White, Background 1 (first row, first option from the left). In the Size box, enter 3.5 pt. On the slide, select the oval. Under Drawing Tools, on the Format tab, in the bottom right corner of the Size group, click the Size and Position dialog box launcher. In the Format Shape dialog box, click Position in the left pane, and in the Position pane, do the following to position the third and fourth ovals: In the Horizontal box, enter 2.98”. In the Vertical box, enter 1.5”. Select the oval. On the Home tab, in the Clipboard group, click the arrow under Paste, and then click Duplicate. Select the duplicate oval. Under Drawing Tools, on the Format tab, in the bottom right corner of the Size group, click the Size and Position dialog box launcher. In the Format Shape dialog box, click Position in the left pane, and in the Position pane, do the following to position the third and fourth ovals: In the Horizontal box, enter 3.52”. In the Vertical box, enter 2.98”. Repeat step 9 two more times, for a total of four ovals. Under Drawing Tools, on the Format tab, in the bottom right corner of the Size group, click the Size and Position dialog box launcher. In the Format Shape dialog box, click Position in the left pane, and in the Position pane, do the following to position the third and fourth ovals: Select the third oval on the slide, and then enter 3.52” in the Horizontal box and 4.27” in the Vertical box. Select the fourth oval on the slide, and then enter 2.99” in the Horizontal box and 5.66” in the Vertical box. To reproduce the text on this slide, do the following: On the Insert tab, in the Text group, click Text Box, and then on the slide, drag to draw the text box. Enter text in the text box and select the text. On the Home tab, in the Font group, do the following: In the Font list, select Corbel. In the Font Size list, select 22. Click the arrow next to Font Color, and then under Theme Colors click White, Background 1, Darker 50% (sixth row, first option from the left). On the Home tab, in the Paragraph group, click Align Text Left to align the text left in the text box. On the slide, drag the text box to the right of the first oval. Select the text box. On the Home tab, in the Clipboard group, click the arrow to the right of Copy, and then click Duplicate. Click in the text box and edit the text. Drag the second text box to the right of the second oval. Repeat steps 5-7 to create the third and fourth text boxes, dragging them to the right of the third and fourth ovals. To reproduce the animation effects on this slide, do the following: On the Home tab, in the Editing group, click Select, and then click Selection Pane. In the Selection and Visibility task pane, select the rectangle group. On the Animations tab, in the Advanced Animation group, click Add Animation, and then under Emphasis click Spin. Also on the Animations tab, in the Animation group, click the Effect Options dialog box launcher. In the Spin dialog box, do the following: On the Effects tab, in the Amount list, in the Custom box, enter 123°, and then press ENTER. Also in the Amount list, click Counterclockwise. On the Timing tab, in the Duration box, select 1.00. On the Timing tab, in the Start list, select With Previous. On the slide, select the first oval. On the Animations tab, in the Advanced Animation group, click Add Animation, and then click More Emphasis Effects. In the Add Emphasis Effect dialog box, under Basic, click Fill Color. On the Animations tab, in the Animation group, click the Effect Options dialog box launcher. In Fill Color dialog box, the do the following: On the Effects tab, in the Fill Color list, click More Colors. In the Colors dialog box, on the Custom tab, enter values for Red:130, Green:153, Blue: 117. On the Timing tab, in the Duration box, , enter 0.50. On the Timing tab, in the Start list, select After Previous. On the slide, select the first text box. On the Animations tab, in the Advanced Animation group, click Add Animation, and then under Entrance click Fade. Also on the Animations tab, in the Timing group, do the following: In the Start list, select With Previous. In the Duration box, enter 0.50. In the Selection and Visibility task pane, select the rectangle group. On the Animations tab, in the Advanced Animation group, click Add Animation, and then under Emphasis click Spin. On the Effects tab, in the Amount list, in the Custom box, enter 22°, and then press ENTER. Also in the Amount list, click Clockwise. On the Timing tab, in the Start list, select On Click. On the Timing tab, in the Duration box, enter 0.50. On the slide, select the second oval. On the Animations tab, in the Advanced Animation group, click Add Animation, and then click More Emphasis Effects. In the Add Emphasis Effect dialog box, under Basic, click Fill Color. On the Animations tab, in the Animation group, click the Effect Options dialog box launcher. In the Fill Color dialog box, do the following: On the slide, select the second text box. On the Animations tab, in the Advanced Animation group, click Add Animation, and then under Entrance click Fade. On the slide, select the third oval. On the Animations tab, in the Advanced Animation group, click Add Animation, and then click More Emphasis Effects. In the Add Emphasis Effect dialog box, under Basic, click Fill Color. On the Timing tab, in the Speed list, select Very Fast. On the slide, select the third text box. On the Animations tab, in the Advanced Animation group, click Add Animation, and then under Entrance click Fade. On the slide, select the fourth oval. On the Animations tab, in the Advanced Animation group, click Add Animation, and then click More Emphasis Effects. In the Add Emphasis Effect dialog box, under Basic, click Fill Color. On the slide, select the fourth text box. On the Animations tab, in the Advanced Animation group, click Add Animation, and then under Entrance click Fade. On the Animations tab, in the Timing group, do the following: In the Duration box, enter 0:50. No toxico ni corrosivo
 To reproduce the background effects on this slide, do the following: On the Home tab, in the Slides group, click Layout, and then click Blank. Right-click the slide background area, and then click Format Background. In the Format Background dialog box, click Fill in the left pane, select Solid fill in the right pane, and select White, Background 1 (first row, first option from the left). To reproduce the rectangle on this slide, do the following: On the Home tab, in the Drawing group, click Shapes, and then under Rectangles click Rounded Rectangle (second option from the left). On the slide, drag to draw a rounded rectangle. Select the rectangle. Drag the yellow diamond adjustment handle to the left to decrease the amount of rounding on the corners. With the rounded rectangle still selected, under Drawing Tools, on the Format tab, in the Size group, do the following: In the Shape Height box, enter In the Shape Width box, enter Under Drawing Tools, on the Format tab, in the bottom right corner of the Shape Styles group, click the Format Shape dialog box launcher. In the Format Shape dialog box, click Fill in the left pane. In the Fill pane, select Solid fill, click the button next to Color, and then under Theme Colors click White, Background 1, Darker 15% (third row, first option from the left). Also in the Format Shape dialog box, click Line Color in the left pane. In the Line Color pane, select No line. Also in the Format Shape dialog box, click Shadow in the left pane. In the Shadow pane, click the button next to Presets, under Outer select Offset Bottom (first row, second option from the left), and then do the following: In the Transparency box, enter 0%. In the Size box, enter 100%. In the Blur box, enter 8.5 pt. In the Angle box, enter 90°. In the Distance box, enter 1 pt. Also in the Format Shape dialog box, click 3-D Format in the left pane. In the 3-D Format tab, do the following: Under Bevel, click the button next to Top, and then under Bevel click Circle (first row, first option from the left). Next to Top, in the Width box, enter 5 pt, and in the Height box, enter 5 pt. Under Surface, click the button next to Material, and then under Standard click Matte (first row, first option from the left). Click the button next to Lighting, and then under Neutral click Soft (first row, third option from the left). On the slide, select the rounded rectangle. On the Home tab, in the Clipboard group, click the arrow to the right of Copy, and then click Duplicate. Select the duplicate rectangle. On the Home tab, in the Drawing group, do the following: Click the arrow next to Shape Fill, and then click No Fill. Click the arrow next to Shape Outline, and then click No Outline. Drag the second rectangle above the first rectangle until the lower edge overlays the top edge of the first rectangle. (Note: When the spinning animation effect is created later for these rectangles, the spin will center where the edges of the rectangles meet.) Press and hold CTRL, and then select both rectangles. On the Home tab, in the Drawing group, click Arrange, and do the following: Point to Align, and then click Align Selected Objects. Point to Align, and then click Align Center. Click Group. On the slide, drag the group until it is centered horizontally on the left edge of the slide (straddling the edge). On the Home tab, in the Drawing group, click Arrange, point to Align, and then do the following: Click Align to Slide. Click Align Middle. To reproduce the dashed arc on this slide, do the following: On the Home tab, in the Drawing group, click Shapes, and then under Basic Shapes click Arc (third row, 12th option from the left). On the slide, drag to draw an arc. Select the arc. Under Drawing Tools, on the Format tab, in the Size group, do the following: In the Shape Height box, enter In the Shape Width box, enter With the arc still selected, on the Home tab, in the Drawing group, click the arrow next to Shape Outline and then do the following: Under Theme Colors, click White, Background 1, Darker 15% (third row, first option from the left). Point to Dashes, and then click Dash (fourth option from the top). On the slide, drag the yellow diamond adjustment handle on the right side of the arc to the bottom of the arc to create a half circle. Drag the arc until the yellow diamond adjustment handles are on the left edge of the slide. With the arc still selected, on the Home tab, in the Drawing group, click the arrow under Arrange, point to Align, and then do the following: To reproduce the half circle on this slide, do the following: On the slide, select the arc. On the Home tab, in the Clipboard group, click the arrow to the right of Copy, and then click Duplicate. Select the duplicate arc. Under Drawing Tools, on the Format tab, in the Size group, do the following: In the Shape Height box, enter In the Shape Width box, enter With the second arc still selected, under Drawing Tools, on the Format tab, in the Shape Styles group, click the arrow next to Shape Fill, and then under Theme Colors click White, Background 1, Darker 5% (second row, first option from the left). Under Drawing Tools, on the Format tab, in the Shape Styles group, click the arrow next to Shape Outline, and then click No Outline. Under Drawing Tools, on the Format tab, in the Shape Styles group, click Shape Effects, point to Shadow, and then click Shadow Options. In the Format Shape dialog box, click Shadow in the left pane. In the Shadow pane, click the button next to Presets , under Inner click Inside Right (second row, third option from the left), and then do the following: In the Transparency box, enter 86%. In the Blur box, enter 24 pt. In the Angle box, enter 315°. In the Distance box, enter 4 pt. On the slide, drag the second arc until the yellow diamond adjustment handles are on the left edge of the slide. On the Home tab, in the Drawing group, click Arrange, and then do the following: Point to Align, and then click Align to Slide. Point to Align, and then click Align Middle. Click Send to Back. To reproduce the button shapes on this slide, do the following: On the Home tab, in the Drawing group, click Shapes, and then under Basic Shapes click Oval (first row, second option from the left). On the slide, drag to draw an oval. Select the oval. Under Drawing Tools, on the Format tab, in the Size group, do the following: In the Shape Height box, enter In the Shape Width box, enter Under Drawing Tools, on the Format tab, in the Shape Styles group, click More, and then click Light 1 Outline, Colored Fill – Olive Green, Accent 3 (third row, first option from the left). Under Drawing Tools, on the Format tab, in the bottom right corner of the Shape Styles group, click the Format Shape dialog box launcher. In the Format Shape dialog box, click Fill in the left pane. In the Fill pane, select Solid Fill. Click the button next to Color, and then under Theme Colors click Olive Green, Accent 3, Lighter 80° (second row, seventh option from the left). Also in the Format Shape dialog box, click Shadow in the left pane. In the Shadow pane, click the button next to Presets, under Outer click Offset Bottom (first row, second option from the left), and then do the following: Also in the Format Shape dialog box, click 3-D Format in the left pane, and then do the following in the 3-D Format pane: Under Bevel, click the button next to Top, and then under Bevel click Art Deco (third row, fourth option from the left). Next to Top, in the Width box, enter 5 pt, and in the Height box, enter 5 pt. Under Contour, click the button next to Color, and then under Theme Colors click White, Background 1 (first row, first option from the left). In the Size box, enter 3.5 pt. On the slide, select the oval. Under Drawing Tools, on the Format tab, in the bottom right corner of the Size group, click the Size and Position dialog box launcher. In the Format Shape dialog box, click Position in the left pane, and in the Position pane, do the following to position the third and fourth ovals: In the Horizontal box, enter In the Vertical box, enter Select the oval. On the Home tab, in the Clipboard group, click the arrow under Paste, and then click Duplicate. Select the duplicate oval. Under Drawing Tools, on the Format tab, in the bottom right corner of the Size group, click the Size and Position dialog box launcher. In the Format Shape dialog box, click Position in the left pane, and in the Position pane, do the following to position the third and fourth ovals: In the Horizontal box, enter In the Vertical box, enter Repeat step 9 two more times, for a total of four ovals. Under Drawing Tools, on the Format tab, in the bottom right corner of the Size group, click the Size and Position dialog box launcher. In the Format Shape dialog box, click Position in the left pane, and in the Position pane, do the following to position the third and fourth ovals: Select the third oval on the slide, and then enter 3.52 in the Horizontal box and 4.27 in the Vertical box. Select the fourth oval on the slide, and then enter 2.99 in the Horizontal box and 5.66 in the Vertical box. To reproduce the text on this slide, do the following: On the Insert tab, in the Text group, click Text Box, and then on the slide, drag to draw the text box. Enter text in the text box and select the text. On the Home tab, in the Font group, do the following: In the Font list, select Corbel. In the Font Size list, select 22. Click the arrow next to Font Color, and then under Theme Colors click White, Background 1, Darker 50% (sixth row, first option from the left). On the Home tab, in the Paragraph group, click Align Text Left to align the text left in the text box. On the slide, drag the text box to the right of the first oval. Select the text box. On the Home tab, in the Clipboard group, click the arrow to the right of Copy, and then click Duplicate. Click in the text box and edit the text. Drag the second text box to the right of the second oval. Repeat steps 5-7 to create the third and fourth text boxes, dragging them to the right of the third and fourth ovals. To reproduce the animation effects on this slide, do the following: On the Home tab, in the Editing group, click Select, and then click Selection Pane. In the Selection and Visibility task pane, select the rectangle group. On the Animations tab, in the Advanced Animation group, click Add Animation, and then under Emphasis click Spin. Also on the Animations tab, in the Animation group, click the Effect Options dialog box launcher. In the Spin dialog box, do the following: On the Effects tab, in the Amount list, in the Custom box, enter 123°, and then press ENTER. Also in the Amount list, click Counterclockwise. On the Timing tab, in the Duration box, select On the Timing tab, in the Start list, select With Previous. On the slide, select the first oval. On the Animations tab, in the Advanced Animation group, click Add Animation, and then click More Emphasis Effects. In the Add Emphasis Effect dialog box, under Basic, click Fill Color. On the Animations tab, in the Animation group, click the Effect Options dialog box launcher. In Fill Color dialog box, the do the following: On the Effects tab, in the Fill Color list, click More Colors. In the Colors dialog box, on the Custom tab, enter values for Red:130, Green:153, Blue: 117. On the Timing tab, in the Duration box, , enter On the Timing tab, in the Start list, select After Previous. On the slide, select the first text box. On the Animations tab, in the Advanced Animation group, click Add Animation, and then under Entrance click Fade. Also on the Animations tab, in the Timing group, do the following: In the Start list, select With Previous. In the Duration box, enter In the Selection and Visibility task pane, select the rectangle group. On the Animations tab, in the Advanced Animation group, click Add Animation, and then under Emphasis click Spin. On the Effects tab, in the Amount list, in the Custom box, enter 22°, and then press ENTER. Also in the Amount list, click Clockwise. On the Timing tab, in the Start list, select On Click. On the Timing tab, in the Duration box, enter On the slide, select the second oval. On the Animations tab, in the Advanced Animation group, click Add Animation, and then click More Emphasis Effects. In the Add Emphasis Effect dialog box, under Basic, click Fill Color. On the Animations tab, in the Animation group, click the Effect Options dialog box launcher. In the Fill Color dialog box, do the following: On the slide, select the second text box. On the Animations tab, in the Advanced Animation group, click Add Animation, and then under Entrance click Fade. On the slide, select the third oval. On the Animations tab, in the Advanced Animation group, click Add Animation, and then click More Emphasis Effects. In the Add Emphasis Effect dialog box, under Basic, click Fill Color. On the Timing tab, in the Speed list, select Very Fast. On the slide, select the third text box. On the Animations tab, in the Advanced Animation group, click Add Animation, and then under Entrance click Fade. On the slide, select the fourth oval. On the Animations tab, in the Advanced Animation group, click Add Animation, and then click More Emphasis Effects. In the Add Emphasis Effect dialog box, under Basic, click Fill Color. On the slide, select the fourth text box. On the Animations tab, in the Advanced Animation group, click Add Animation, and then under Entrance click Fade. On the Animations tab, in the Timing group, do the following: In the Duration box, enter 0:50. No toxico ni corrosivo.")
29
Factores que afectan la cinética de acción de un agente desinfectante
Concentración del agente pH del medio Presencia de materiales extraños Tiempo de exposición Temperatura Numero inicial de la población

30
Formaldehido El formaldehído (HCHO) es un gas que mata todos los microorganismos y esporas a temperaturas superiores a los 20°C. Su acción es relativamente lenta. Se comercializa en forma de polímero sólido (paraformaldehído), o como formol
, o como formol.")
31
Ambas formulaciones se calientan para liberar el gas, que se utiliza en la descontaminación y la desinfección de espacios cerrados como CSB y locales

32
Glurataldehido Al igual que el formaldehído, el glutaraldehído (OHC(CH2)3CHO) tiene actividad contra formas vegetativas de bacterias, esporas, hongos y virus con y sin envoltura lipídica.
3CHO) tiene actividad contra formas vegetativas de bacterias, esporas, hongos y virus con y sin envoltura lipídica.")
33
No es corrosivo y su acción es más rápida que la del formaldehído
No es corrosivo y su acción es más rápida que la del formaldehído. No obstante, tarda varias horas en matar las esporas bacterianas. Son agentes alquilantes que actúan sobre proteínas, lo que provoca modificación irreversible de enzimas e inhibición de la actividad enzimática (Adición nucleofílica de grupos -NH2 y -SH).
.")
34
Compuestos fenolicos Tienen actividad contra las formas vegetativas de las bacterias y contra los virus con envoltura lipídica y, cuando están debidamente formulados, también son activos contra las micobacterias.

35
Son desinfectantes que provocan lesiones en la membrana citoplasmática porque desordenan la disposición de las proteínas y fosfolípidos. Esto causa filtración de compuestos celulares, inactivación de enzimas y lisis. Hexaclorofeno

36
El triclosán es común en los productos para el lavado de manos
El triclosán es común en los productos para el lavado de manos. Tiene actividad principalmente contra las formas vegetativas de las bacterias y es inocuo para la piel y las mucosas

37
Compuestos cuaternarios de amonio
Muchos tipos de compuestos de amonio cuaternario se utilizan como mezclas y a menudo en combinación con otros germicidas, como los alcoholes. Algunos tipos (por ejemplo, el cloruro de benzalconio) se utilizan como antisépticos.
 se utilizan como antisépticos.")
38
Debido a su baja biodegradabilidad, estos compuestos también pueden acumularse en el medio ambiente.
Mecanismo de acción: Desnaturalización de proteínas, lisis celular, inactivación enzimática

39
Alcoholes El etanol (alcohol etílico, C2H5OH) y el 2-propanol (alcohol isopropílico, (CH3)2CHOH) tienen propiedades desinfectantes similares. Para conseguir la máxima eficacia deben utilizarse en concentraciones acuosas de aproximadamente un 70% (v/v)
")
40
Lesionan la membrana celular de los microorganismos y desnaturalizan proteínas celulares. Desorganizan la estructura fosfolipídica. Una de las grandes ventajas de las soluciones acuosas de alcoholes es que no dejan residuo alguno en los objetos tratados

41
Hipocloritos El cloro, los hipocloritos y las cloraminas son desinfectantes que actúan sobre proteínas y ácidos nucleicos de los microorganismos. Oxidan grupos -SH, y atacan grupos aminos, indoles y al hidroxifenol de la tirosina.

42
El producto clorado más utilizado en desinfección es el hipoclorito de sodio, que es activo sobre todas las bacterias, incluyendo esporas, y además es efectivo en un amplio rango de temperaturas.

43
Su actividad está influida por la presencia de materia orgánica, pues puede haber en el medio sustancias capaces de reaccionar con los compuestos clorados que disminuyan la concentración efectiva de éstos

44
Yodoforos La acción de estos desinfectantes es análoga a la del cloro, aunque pueden ser ligeramente menos susceptibles a la inhibición por la materia orgánica. El yodo puede manchar los tejidos y las superficies del entorno, y en general no es adecuado como desinfectante. Por otro lado, los yodóforos y las tinturas de yodo son buenos antisépticos.

45
La povidona yodada es un agente de lavado quirúrgico fiable e inocuo, y sirve como antiséptico cutáneo preoperatorio.

Presentaciones similares