Descargar la presentación
La descarga está en progreso. Por favor, espere

1
¿Qué son? – tipos – manejo - ejemplos
Excepciones en java ¿Qué son? – tipos – manejo - ejemplos

2
¿Qué es una excepción? Es una condición anormal ocurrida durante la ejecución de un programa. No necesariamente es un error, sino más bien un comportamiento no adecuado o no permitido. A diferencia de otros lenguajes de programación orientados a objetos, Java incorpora la gestión de excepciones, a través de ciertas clases especiales.

3
Cuando ocurre una excepción, se crea un objeto que contiene toda la información acerca de ésta. El interpretador (JVM) debe encontrar el código para manejarla (lanzar la excepción). Si existe un código definido para el tipo de excepción, este código atrapa la excepción. Si no existe código definido para este tipo de excepción, el programa se termina.
 debe encontrar el código para manejarla (lanzar la excepción). Si existe un código definido para el tipo de excepción, este código atrapa la excepción. Si no existe código definido para este tipo de excepción, el programa se termina..")
4
Tipos de excepciones Trowable Exception Error Runtime Exception
IOException EOFException NullPointerException FileNotFoundException IndexOutOfBoundsException MalformedURLException NegativeArraySizeException ArithmeticException

5
Manejador de excepciones
Sirve para : Procesar solamente situaciones excepcionales donde un método no podría completar su tarea debido a que no posee el control. En proyectos grandes para manejar las excepciones de una manera uniforme en todo el proyecto. Simplifican los programas ya que se diferencia el código normal del código de tratamiento de errores. Se crean programas mas robustos ya que en muchos casos si no se trata la excepción el programa no compila.

6
PALABRAS CLAVE AL MANEJAR EXCEPCIONES
try Catch throw throws Animated series of emerging circles (Intermediate) To reproduce the SmartArt on this slide, do the following: On the Home tab, in the Slides group, click Layout, and then click Blank. Also under Bevel, to the right of the Top list, in the Width box enter 30 pt. On the Insert tab, in the Illustrations group, click SmartArt. In the Choose a SmartArt Graphic dialog box, in the left pane, click Relationship. In the Relationship pane, click Basic Radial (eighth row, second option from the left), and then click OK to insert the graphic into the slide. Also under Bevel, to the right of the Top list, in the Height box enter 30 pt. On the Home tab, in the Font group, in the Font Size box enter 40 pt. and click Bold. On the slide, select the SmartArt graphic, and then click one of the arrows on the left border. In the Type your text here dialog box, in the top-level bullet, enter the text for the center circle of the graphic. In the second-level bullets, enter the text for all the other shapes in the SmartArt graphic. Position the top circle slightly towards the bottom of the slide. To reproduce the line effects on this slide, do the following: Press and hold CTRL and select each of the four lines connecting the circles in the SmartArt graphic. With the SmartArt graphic still selected, on the Design tab, in the Themes group, click Colors and select Median. On the Home tab, in the bottom right corner of the Drawing group, click the Format Shape dialog box launcher. In the Format Shape dialog box, click Line Color in the left pane, and in the Line Color pane do the following: Under SmartArt Tools, on the Format tab, in the Size group, do the following: In the Shape Height box, enter 5”. In the Shape Width box, enter 7.5”. Click Gradient line. In the Type list, select Linear. Under SmartArt Tools, on the Format tab, in the Arrange group, click Align and then do the following: In the Direction list, select Linear Right (first row, fourth option from the left). Click Align to Slide. Under Gradient stops, click Add or Remove until two stops appear on the slider, then customize the gradient stops as follows: Click Align Center. Click Align Middle. Under SmartArt Tools, on the Design tab, in the SmartArt Styles group, click the More arrow at the SmartArt Styles gallery, and then under Best Match for Document select Intense Effect (the fifth option from the left). Select Stop 1 on the slider, and then do the following: In the Position box, enter 0%. On the Home tab, in the Font group, click the button next to Font Color, and then under Theme Colors select Black, Text 1 (first row, the second option from the left). Click the button next to Color, and then under Theme Colors click Black, Text 1 (first row, second option from the left). On the Home tab, in the bottom right corner of the Drawing group, click the Format Shape dialog box launcher. In the Format Shape dialog box, click 3-D Format in the left pane, and in the 3-D Format pane, under Surface do the following: Select Stop 2 from the list, and then do the following: In the Stop position box, enter 100%. In the Material list, under Special Effect, select Soft Edge (second option from the left). In the Lighting list, under Neutral, select Harsh (first row, the fourth option from the left). In the Transparency box, enter 100%. Also in the Format Shape dialog box, click Line Style in the left pane, and in the Line Style pane do the following: In the Angle box, enter 30°. Press and hold CTRL, and select all five shapes in the SmartArt graphic, and then on the Home tab, in the bottom right corner of the Drawing group, click the Format Shape dialog box launcher. In the Format Shape dialog box, click Shadow in the left pane, and in the Shadow pane do the following: In the Width box, enter 3.5 pt. In the Dash type list, select Round Dot (second option from the top). To reproduce the animation effects on this slide, do the following: In the Presets list, under Outer, select Offset Bottom (first row, the second option from the left). On the Animation tab, in the Advanced Animations group, click Animation Pane. In the Transparency box, enter 65%. On the slide, select the SmartArt graphic, and then on the Animations tab, in the Animation group, click the More arrow at the Effects Gallery and click More Entrance Effects. In the Change Entrance Effect dialog box, under Moderate, select Basic Zoom, and then click OK. In the Size box, enter 103%. In the Blur box, enter 9 pt. In the Angle box, enter 90°. In the Distance box, enter 3 pt. In the Animation group, click Effect Options and do the following: To reproduce the SmartArt effects on this slide, do the following: Under Direction, click In from Screen Center. On the slide, select the center circle in the SmartArt graphic, and then on the Home tab, in the bottom right corner of the Drawing group, click the Format Shape dialog box launcher. In the Format Shape dialog box, click 3-D Format in the left pane, and in the 3-D Format pane do the following: Under Sequence, click One by one. In the Custom Animation task pane, expand the contents by clicking the double arrow under the zoom entrance effect, and then do the following: Select the first effect (zoom entrance effect), and in the Timing group, in the Start list, select With Previous. Under Bevel, in the Top list, under Bevel, select Circle (first row, the first option from the left). Select the second effect (zoom entrance effect). On the Animations tab, in the Animation group, click the More arrow at the Effects Gallery, and under Entrance, click Wipe, and click OK. Also under Bevel, to the right of the Top list, in the Width box enter 24 pt. Also under Bevel, to the right of the Top list, in the Height box enter 12 pt. On the slide, select the top circle in the SmartArt graphic, and then on the Home tab, in the bottom right corner of the Drawing group, click the Format Shape dialog box launcher. In the Format Shape dialog box, click Fill in the left pane, and in the Fill pane do the following: With the second effect (now wipe effect) still selected, do the following: In the Animation group, click Effect Options, and then under Direction, select From Bottom. Click Solid fill. In the Timing group, in the Delay list, enter Click the button next to Color, and then under Theme Colors select Orange, Accent 2 (first row, the sixth option from the left) In the Timing group, in the Duration list, enter Also in the Format Shape dialog box, click 3-D Format in the left pane, and in the 3-D Format pane do the following: Select the fourth effect (zoom entrance effect). On the Animations tab, in the Animation group, click the More arrow at the Effects Gallery, and under Entrance, click Wipe, and click OK. With the fourth effect (now wipe effect) still selected, do the following: Also under Bevel, to the right of the Top list, in the Width box enter 20 pt. In the Animation group, click Effect Options, and then under Direction, select From Left. Also under Bevel, to the right of the Top list, in the Height box enter 15 pt. Press and hold SHIFT, and drag a corner sizing handle towards the center of this circle to make it smaller. On the Home tab, in the Font group, in the Font Size box enter 20 pt. Position the top circle slightly over to the right 0.5”. Select the sixth effect (zoom entrance effect). On the Animations tab, in the Animation group, click the More arrow at the Effects Gallery, and under Entrance, click Wipe, and click OK. Select the right circle in the SmartArt graphic, and then on the Home tab, in the bottom right corner of the Drawing group, click the Format Shape dialog box launcher. In the Format Shape dialog box, click Fill in the left pane, and in the Fill pane do the following: With the sixth effect (now wipe effect) still selected, do the following: Click the button next to Color, and then Theme Colors select Gold, Accent 4 (first row, the eighth option from the left) Select the eighth effect (zoom entrance effect). On the Animations tab, in the Animation group, click the More arrow at the Effects Gallery, and under Entrance, click Wipe, and click OK. With the eighth effect (now wipe effect) still selected, do the following: In the Animation group, click Effect Options, and then under Direction, select From Right. On the Home tab, in the Font group, in the Font Size box enter 28 pt. Position the right circle slightly towards the upper right corner of the slide. One the slide, select the bottom circle in the SmartArt graphic, and then on the Home tab, in the bottom right corner of the Drawing group, click the Format Shape dialog box launcher. In the Format Shape dialog box, click Fill in the left pane, and in the Fill pane do the following: To reproduce the background on this slide, do the following: In the Color list, under Theme Colors select Green, Accent 5 (first row, the ninth option from the left) Right-click the slide background area, and then click Format Background. In the Format Background dialog box, click Fill in the left pane, select Gradient fill in the Fill pane, and then do the following: In the Type list, select Radial. In the Direction, list click From Center (third option from the left) Under Bevel, in the Top list, select Circle (first row, the first option from the left). in the drop-down list. Press and hold SHIFT, and drag a corner sizing handle away from the center of this circle to make it larger. Click the button next to Color, and then under Theme Colors click Black, Text 1, Lighter 35% (third row, second option from the left). Drag the circle slightly toward the right edge of the slide. On the slide, select the left circle in the SmartArt graphic, and then on the Home tab, in the bottom right corner of the Drawing group, click the Format Shape dialog box launcher. In the Format Shape dialog box, click Fill in the left pane, and in the Fill pane do the following: Select Stop 2 on the slider, and then do the following: In the Position box, enter 100%. In the Color list, under Theme Colors select Olive Green, Accent 3 (first row, the seventh option from the left) PALABRAS CLAVE AL MANEJAR EXCEPCIONES
 To reproduce the SmartArt on this slide, do the following: On the Home tab, in the Slides group, click Layout, and then click Blank. Also under Bevel, to the right of the Top list, in the Width box enter 30 pt. On the Insert tab, in the Illustrations group, click SmartArt. In the Choose a SmartArt Graphic dialog box, in the left pane, click Relationship. In the Relationship pane, click Basic Radial (eighth row, second option from the left), and then click OK to insert the graphic into the slide. Also under Bevel, to the right of the Top list, in the Height box enter 30 pt. On the Home tab, in the Font group, in the Font Size box enter 40 pt. and click Bold. On the slide, select the SmartArt graphic, and then click one of the arrows on the left border. In the Type your text here dialog box, in the top-level bullet, enter the text for the center circle of the graphic. In the second-level bullets, enter the text for all the other shapes in the SmartArt graphic. Position the top circle slightly towards the bottom of the slide. To reproduce the line effects on this slide, do the following: Press and hold CTRL and select each of the four lines connecting the circles in the SmartArt graphic. With the SmartArt graphic still selected, on the Design tab, in the Themes group, click Colors and select Median. On the Home tab, in the bottom right corner of the Drawing group, click the Format Shape dialog box launcher. In the Format Shape dialog box, click Line Color in the left pane, and in the Line Color pane do the following: Under SmartArt Tools, on the Format tab, in the Size group, do the following: In the Shape Height box, enter 5 . In the Shape Width box, enter Click Gradient line. In the Type list, select Linear. Under SmartArt Tools, on the Format tab, in the Arrange group, click Align and then do the following: In the Direction list, select Linear Right (first row, fourth option from the left). Click Align to Slide. Under Gradient stops, click Add or Remove until two stops appear on the slider, then customize the gradient stops as follows: Click Align Center. Click Align Middle. Under SmartArt Tools, on the Design tab, in the SmartArt Styles group, click the More arrow at the SmartArt Styles gallery, and then under Best Match for Document select Intense Effect (the fifth option from the left). Select Stop 1 on the slider, and then do the following: In the Position box, enter 0%. On the Home tab, in the Font group, click the button next to Font Color, and then under Theme Colors select Black, Text 1 (first row, the second option from the left). Click the button next to Color, and then under Theme Colors click Black, Text 1 (first row, second option from the left). On the Home tab, in the bottom right corner of the Drawing group, click the Format Shape dialog box launcher. In the Format Shape dialog box, click 3-D Format in the left pane, and in the 3-D Format pane, under Surface do the following: Select Stop 2 from the list, and then do the following: In the Stop position box, enter 100%. In the Material list, under Special Effect, select Soft Edge (second option from the left). In the Lighting list, under Neutral, select Harsh (first row, the fourth option from the left). In the Transparency box, enter 100%. Also in the Format Shape dialog box, click Line Style in the left pane, and in the Line Style pane do the following: In the Angle box, enter 30°. Press and hold CTRL, and select all five shapes in the SmartArt graphic, and then on the Home tab, in the bottom right corner of the Drawing group, click the Format Shape dialog box launcher. In the Format Shape dialog box, click Shadow in the left pane, and in the Shadow pane do the following: In the Width box, enter 3.5 pt. In the Dash type list, select Round Dot (second option from the top). To reproduce the animation effects on this slide, do the following: In the Presets list, under Outer, select Offset Bottom (first row, the second option from the left). On the Animation tab, in the Advanced Animations group, click Animation Pane. In the Transparency box, enter 65%. On the slide, select the SmartArt graphic, and then on the Animations tab, in the Animation group, click the More arrow at the Effects Gallery and click More Entrance Effects. In the Change Entrance Effect dialog box, under Moderate, select Basic Zoom, and then click OK. In the Size box, enter 103%. In the Blur box, enter 9 pt. In the Angle box, enter 90°. In the Distance box, enter 3 pt. In the Animation group, click Effect Options and do the following: To reproduce the SmartArt effects on this slide, do the following: Under Direction, click In from Screen Center. On the slide, select the center circle in the SmartArt graphic, and then on the Home tab, in the bottom right corner of the Drawing group, click the Format Shape dialog box launcher. In the Format Shape dialog box, click 3-D Format in the left pane, and in the 3-D Format pane do the following: Under Sequence, click One by one. In the Custom Animation task pane, expand the contents by clicking the double arrow under the zoom entrance effect, and then do the following: Select the first effect (zoom entrance effect), and in the Timing group, in the Start list, select With Previous. Under Bevel, in the Top list, under Bevel, select Circle (first row, the first option from the left). Select the second effect (zoom entrance effect). On the Animations tab, in the Animation group, click the More arrow at the Effects Gallery, and under Entrance, click Wipe, and click OK. Also under Bevel, to the right of the Top list, in the Width box enter 24 pt. Also under Bevel, to the right of the Top list, in the Height box enter 12 pt. On the slide, select the top circle in the SmartArt graphic, and then on the Home tab, in the bottom right corner of the Drawing group, click the Format Shape dialog box launcher. In the Format Shape dialog box, click Fill in the left pane, and in the Fill pane do the following: With the second effect (now wipe effect) still selected, do the following: In the Animation group, click Effect Options, and then under Direction, select From Bottom. Click Solid fill. In the Timing group, in the Delay list, enter Click the button next to Color, and then under Theme Colors select Orange, Accent 2 (first row, the sixth option from the left) In the Timing group, in the Duration list, enter Also in the Format Shape dialog box, click 3-D Format in the left pane, and in the 3-D Format pane do the following: Select the fourth effect (zoom entrance effect). On the Animations tab, in the Animation group, click the More arrow at the Effects Gallery, and under Entrance, click Wipe, and click OK. With the fourth effect (now wipe effect) still selected, do the following: Also under Bevel, to the right of the Top list, in the Width box enter 20 pt. In the Animation group, click Effect Options, and then under Direction, select From Left. Also under Bevel, to the right of the Top list, in the Height box enter 15 pt. Press and hold SHIFT, and drag a corner sizing handle towards the center of this circle to make it smaller. On the Home tab, in the Font group, in the Font Size box enter 20 pt. Position the top circle slightly over to the right Select the sixth effect (zoom entrance effect). On the Animations tab, in the Animation group, click the More arrow at the Effects Gallery, and under Entrance, click Wipe, and click OK. Select the right circle in the SmartArt graphic, and then on the Home tab, in the bottom right corner of the Drawing group, click the Format Shape dialog box launcher. In the Format Shape dialog box, click Fill in the left pane, and in the Fill pane do the following: With the sixth effect (now wipe effect) still selected, do the following: Click the button next to Color, and then Theme Colors select Gold, Accent 4 (first row, the eighth option from the left) Select the eighth effect (zoom entrance effect). On the Animations tab, in the Animation group, click the More arrow at the Effects Gallery, and under Entrance, click Wipe, and click OK. With the eighth effect (now wipe effect) still selected, do the following: In the Animation group, click Effect Options, and then under Direction, select From Right. On the Home tab, in the Font group, in the Font Size box enter 28 pt. Position the right circle slightly towards the upper right corner of the slide. One the slide, select the bottom circle in the SmartArt graphic, and then on the Home tab, in the bottom right corner of the Drawing group, click the Format Shape dialog box launcher. In the Format Shape dialog box, click Fill in the left pane, and in the Fill pane do the following: To reproduce the background on this slide, do the following: In the Color list, under Theme Colors select Green, Accent 5 (first row, the ninth option from the left) Right-click the slide background area, and then click Format Background. In the Format Background dialog box, click Fill in the left pane, select Gradient fill in the Fill pane, and then do the following: In the Type list, select Radial. In the Direction, list click From Center (third option from the left) Under Bevel, in the Top list, select Circle (first row, the first option from the left). in the drop-down list. Press and hold SHIFT, and drag a corner sizing handle away from the center of this circle to make it larger. Click the button next to Color, and then under Theme Colors click Black, Text 1, Lighter 35% (third row, second option from the left). Drag the circle slightly toward the right edge of the slide. On the slide, select the left circle in the SmartArt graphic, and then on the Home tab, in the bottom right corner of the Drawing group, click the Format Shape dialog box launcher. In the Format Shape dialog box, click Fill in the left pane, and in the Fill pane do the following: Select Stop 2 on the slider, and then do the following: In the Position box, enter 100%. In the Color list, under Theme Colors select Olive Green, Accent 3 (first row, the seventh option from the left) PALABRAS CLAVE AL MANEJAR EXCEPCIONES.")
7
try Entre las llaves de try escribiremos el código que hará funcional nuestro programa. Las instrucciones contenidas en un bloque try, lanzarán la excepción si ésta ocurre.

8
De esta manera yo puedo controlar a la Excepción
De esta manera yo puedo controlar a la Excepción. Si no se utilizara el bloque Try, se termina la aplicación y nos sale un error en la consola.

9
Al no utilizar try , al momento de correr la aplicación va a generarse una Excepción y como no la manejamos, se corta la aplicación

10
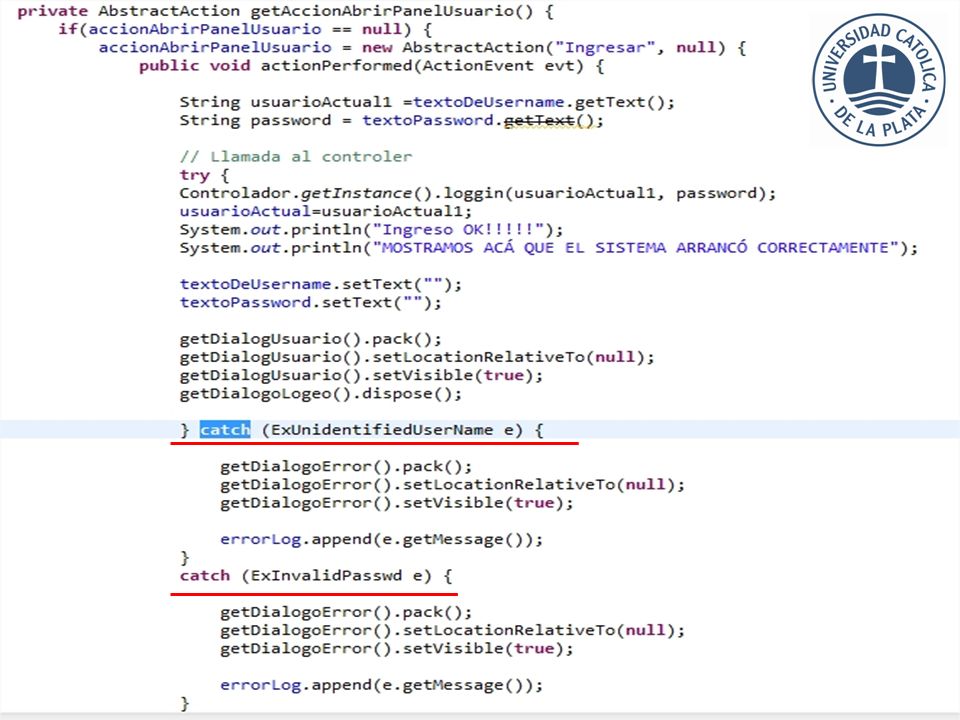
Catch Para capturar la excepción que puede generar este código necesitaremos de esta otra instrucción. Se debe escribir inmediatamente después del bloque try. Puede haber varios bloques catch para un bloque try, y cada bloque catch manejará un tipo de excepción. Es decir, la sentencia “Catch” atrapa la excepción lanzada y la maneja.

11
De esta manera podemos impedir que la
aplicación se corte, al encontrarse con un ‘comportamiento no adecuado’. En este ejemplo vemos como el catch maneja la Excepción y la imprime en la consola, siempre y cuando ésta se genere.

13
Cómo definir excepciones personalizadas
A pesar de la gran cantidad de clases que Java posee para el manejo de excepciones, se permite la creación de excepciones propias al programador. Normalmente se crean nuevas excepciones cuando las clases que posee Java no contemplan el manejo de una situación anómala particular. Para crear las excepciones propias se hereda de la clase Exception o de una de sus subclases.

14
definir excepciones personalizadas
Al definir Excepciones personalizadas, es conveniente generar un paquete nuevo.

15
definir excepciones personalizadas
Pasos para crear una Excepción propia : Dentro del paquete de Excepciones generar una nueva clase con el nombre deseado. Se define para esta nueva clase que herede de Throwable o generalmente de Exception.

16
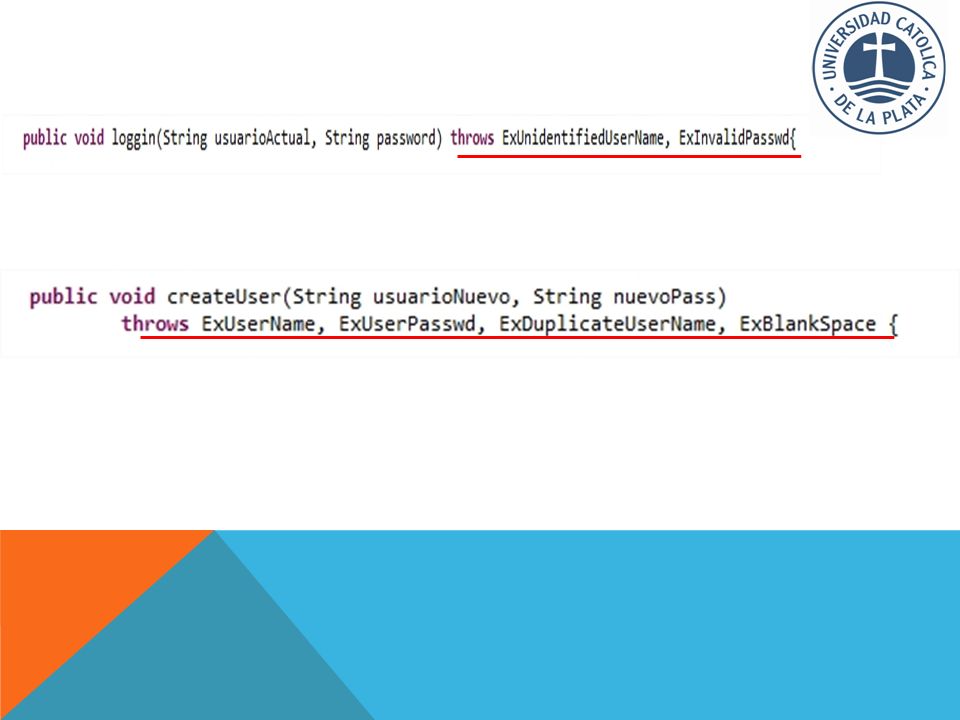
throws En ciertos casos, cuando un método puede generar una situación anómala, y no se desea manipular la excepción en el código del propio método, es posible que se pase o se “relance” la excepción al método invocador, para ello se utiliza la sentencia throws. Dicha sentencia obliga a quién invoque al método, usar un bloque try / catch o propagarlo con otro throw.

18
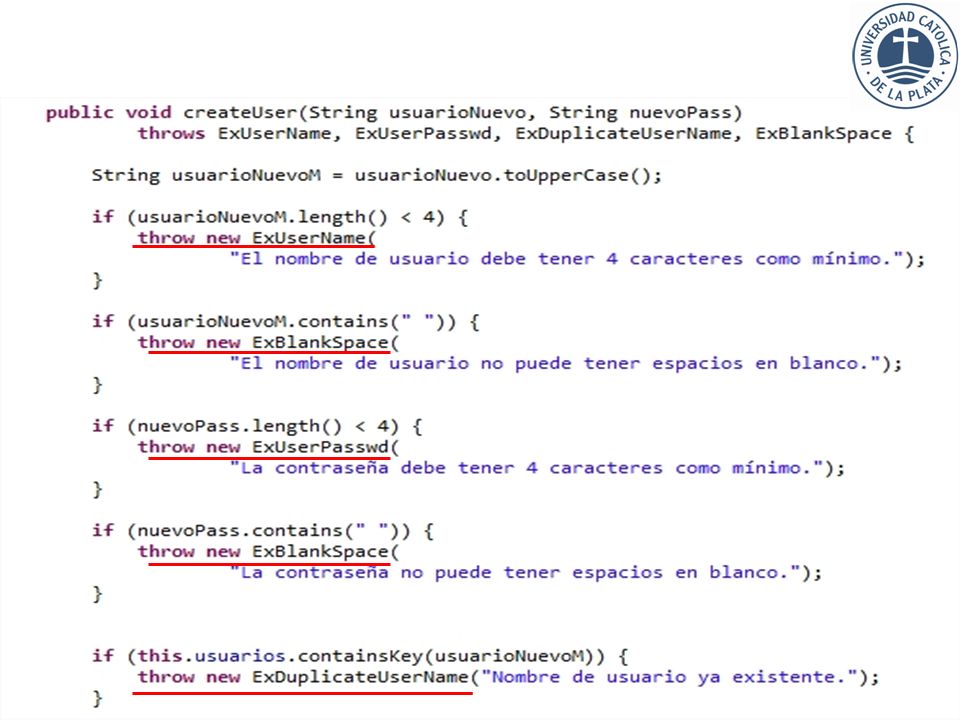
throw La sentencia throw (lanzar) se puede emplear para indicar que ha ocurrido una excepción, particularmente cuando se quiere lanzar una excepción propia. throw requiere un simple argumento: un objeto de la clase Throwable, esta clase tiene dos subclases principales: Exception y Error.
 se puede emplear para indicar que ha ocurrido una excepción, particularmente cuando se quiere lanzar una excepción propia. throw requiere un simple argumento: un objeto de la clase Throwable, esta clase tiene dos subclases principales: Exception y Error.")
20
Fin! Juan Manuel Ruiz

Presentaciones similares

 creación de varias clases, y composición (2) manejo de threads (3) manejo de excepciones.>")


 que se generan en ejecución en casos de errores, para que puedan ser gestionadas en el programa.>")


 ENCAPSULACION Y HERENCIA>")
>")