Descargar la presentación
La descarga está en progreso. Por favor, espere

1
Entrenamiento en el LogTag
Welcome to the new LogTag training designed to walk you through the installation process for your LogTag data logger. Enero 2015

2
Contenido del entrenamiento en el LogTag
Lo necesario para instalar el LogTag Instalación del software LogTag Configuración del LogTag Preparación del LogTag Inicio del LogTag Revisión diaria de las estadísticas Alarma y excursiones de temperatura Análisis de los datos provenientes del LogTag Soluciones de problemas con el LogTag In this training session - we will cover the following: things needed to install the LogTag, preparing the LogTag, installing the LogTag software, configuring and starting the LogTag, reviewing daily statistics, alarm and temperature excursions, analyzing data from the LogTag and trouble-shooting the LogTag.

3
Lo necesario para instalar el LogTag
Acceso a Internet – Descargue el Software Probe/Vial – Botella pequeña Estación de carga (Dock) Acceso directo al escritorio Conectar a puerto USB Log Tag There are a few things you will need to have in order to successfully install your LogTag. You will need to have internet access to download the LogTag software. Once the software is installed, you will see the LogTag icon on your desktop. You’ll also need the Probe/vial and small bottle. Be sure that you have a LogTag docking station. You will need access to an USB port on your computer And of course, you will need the LogTag data logger!
 Acceso directo al escritorio. Conectar a puerto USB. Log Tag. There are a few things you will need to have in order to successfully install your LogTag. You will need to have internet access to download the LogTag software. Once the software is installed, you will see the LogTag icon on your desktop. You’ll also need the Probe/vial and small bottle. Be sure that you have a LogTag docking station. You will need access to an USB port on your computer. And of course, you will need the LogTag data logger!")
4
Instalación del software LogTag
Our first section of this training is going to cover installing the software.

5
Abra el explorador de internet y diríjase hacia http://www. microdaq
Abra el explorador de internet y diríjase hacia para descargar el Software LogTag Analyzer Installing the LogTag software Download the LogTag Analyzer Software by going to and then selecting the link for “LogTag Analyzer Software.

6
Haga clic sobre “RUN” para descargar el Software Analyzer
Click “Run” to load the LogTag software.

7
Luego haga clic sobre “RUN”
Click “Run” when asked “Do you want to run this software?”

8
Cuando el LogTag Analyzer Set-up se abra, seleccione el lenguaje deseado y haga clic sobre “OK”
When the LogTag Analyzer set-up opens, select the desired language from the drop-down menu then click on the “ok” button.

9
Haga clic sobre “NEXT” en la siguiente pantalla
Next you will see this screen that says “Welcome to the LogTag Analyzer Set-up Wizard.” Click the “Next button.”

10
Seleccione “I accept the terms in the license agreement”
Seleccione “I accept the terms in the license agreement”. Haga clic sobre “NEXT” para aceptar el contrato de licencia de usuario. Click to accept the terms of the licensing agreement and then select “Next.”

11
Acepte la carpeta que se muestre o haga clic sobre “BROWSE” para seleccionar otra carpeta. Luego haga clic sobre “Next”. The software will automatically generate and save in the location for you. If you want to change this location, you can click on the “browse” button and make your selection. Then, click “next.”

12
Haga clic sobre “INSTALL” para comenzar la instalación del LogTag Analyzer
Now the setup wizard is ready to begin the LogTag Analyzer installation, begin this process by clicking the “install” button.

13
El progreso del proceso de instalación se indica mediante una barra verde
The software will begin to install at this point. The green bar will indicate the installation progress.

14
Haga clic sobre “FINISH”
Click “finish” to exit the Setup Wizard.

15
En el escritorio, busque el ícono del software del LogTag Analyzer recientemente instalado. Si no encuentra el ícono en el escritorio, entonces busque en el menú “START” Look for the newly installed LogTag Analyzer Software icon on your desktop. If you do not find the icon on your desktop, look for it in the start menu. VERY IMPORTANT! One thing I want to mention here. If you click on the icon and the software does not load, you must uninstall the LogTag software from the computer and reinstall it by going back over the previous steps of the installation process.

16
En el escritorio, busque el ícono del software del LogTag Analyzer recientemente instalado. Si no encuentra el icono en el escritorio, entonces busque en el menú “START” Locate the icon and double-click on it. Again, if you do not see it on your desktop, look in your start menu for “LogTag Analyzer.”.

17
Configuración del LogTag
Now it is time to configure or “tie” the LogTag to the software.

18
Insert the USB end of the docking station into the USB port on the computer or laptop. After plugging in the docking station for the first time, the system will install drivers for the device and should notify you as this occurs. Please allow a moment for this to complete.”

19
Insert the LogTag into the docking station with the digital screen facing forward, until it clicks.

20
The LogTag Analyzer software will open on your screen
Insert the LogTag into the docking station with the digital screen facing frontward, until it clicks The LogTag Analyzer software will open on your screen The picture on this screen is an indicator that the docking station is connected to the computer.

22
Haga clic sobre el ícono LogTag que se localiza en la barra de herramientas
Now click on the LogTag icon in the upper left corner of your screen – it looks like a tiny cell phone.

23
Haga clic sobre “NEXT” When this screen comes up – click “next”

24
You should have a screen now that looks like this one.
The first thing that needs to be done is you will need to give it a User ID on the first line indicated by the red arrow on your screen. When assigning the User ID, use the format of PIN-FREEZER (or whatever name such as “breakroom” or just something easy to remember or PIN-REFRIGERATOR and a number at the end if you have more than one of that type of unit. It is imperative that the names of the unit are identical to what you current in Florida SHOTS or your data will not upload. Everything else on this page is pre-configured – just check to ensure that your page is exactly like the page appearing on the screen. Be sure and leave the password options blank – and DO NOT click on “next” yet. Now, click on “Advanced Options.”

25
On the Configure – Advanced Options screen – the settings are pre-configured. Select “Fahrenheit” for the Temperature Display Unit and then click on the “ok” button.

26
Click the “next” button.

28
Then click “next” to continue.

29
Click “NEXT” and on the next screen select “CLOSE”
Click “NEXT” and on the next screen select “CLOSE”. Now would be a good time to any other LogTag devices which need to be set-up for use. This configuration process is also used to “reset” a LogTag device after each successful download.

31
Now from the menu bar at the top of this page, click “edit” then select “options.”

32
En el menú de la izquierda, haga clic sobre “GENERAL SETTINGS”
En el menú principal, haga clic sobre “EDIT”, luego seleccione “OPTIONS” En el menú de la izquierda, haga clic sobre “GENERAL SETTINGS” Muestre las temperaturas en “FAHRENHEIT” A list will appear on the left, click on “general settings” which appears at the top of the list and confirm the “show temperatures” and select “Fahrenheit.”

33
En el menú de la izquierda, haga clic sobre“FILE AND FOLDER SETTINGS”
En la casilla correspondiente a “FILE” escriba lo siguiente: %ID %STARTED %START-DATE, Finished %FINISH-DATE Then move down to the “File and Folder Setting” on the “file” line type %ID %STARTED %START-DATE, Finished %FINISH-DATE Now this file name is a little different than the first version in the power point put together by Microdaq. I spoke with IT in our office and he said that either one will work. I would say not to worry about those that have been set up using the old version because this will not cause a problem with uploading to Florida SHOTS. Going forward, this is what should be used – for consistency among the field staff.

34
En la casilla correspondiente a “FOLDER”, seleccione la carpeta en la que el usuario guardará los archivos de datos provenientes del LogTag Dicha carpeta necesita ser accedida por múltiples usuarios, por lo que lo ideal es que la carpeta se localice en una unidad compartida. Si existen múltiples usuarios para la misma computadora, el escritorio podría ser utilizado con este propósito. Haga clic sobre “…” Seleccione la unidad donde los archivos del LogTag serán guardados. Si la carpeta del LogTag ya existe, haga clic sobre “…” On the “Folder” line, select a place where the user will save the LogTag data files. It is VERY important to note that the place selected to save the LogTag data files needs to be accessible to multiple users – so a shared folder is ideal. Then select the drive where the LogTag data files will be stored. If a LogTag already exists there, click on the “…” button, a “locate folder” box will appear.

35
Seleccione la unidad donde los archivos del LogTag serán guardados
Seleccione la unidad donde los archivos del LogTag serán guardados. Si la carpeta LogTag ya existe, haga clic una vez para seleccionarla, y luego haga clic sobre “OK” Si no existiese una carpeta, haga clic sobre “MAKE NEW FOLDER”, nómbrela LogTag, y luego haga clic sobre “OK” From that list, you may now select the drive where the LogTag files will be stored. If a folder already exists – click once to select it then click on “ok.” If the folder was not yet created, click on “make new folder”, name it LogTag, then click “ok.”

36
Click the second box “Re-configure with same settings after automatic download”, then click on “OK”.

37
Configuración de los perfiles de usuarios

38
Abra el software LogTag Analyzer Seleccione “Edit” y luego “Options”
PERFILES DE USUARIOS: Abra el software LogTag Analyzer Seleccione “Edit” y luego “Options” Open the LogTag software, then choose “edit” then “options”

39
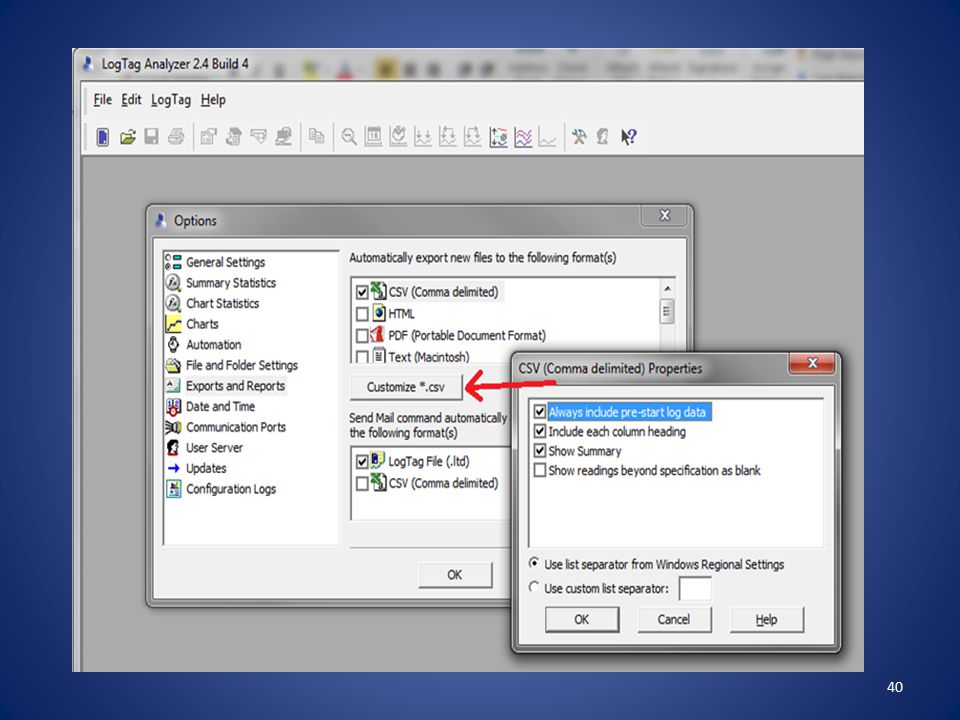
Seleccione “Exports and Reports” Haga clic sobre Customize *.csv
Click on “Exports and Reports”, check the box next to “CSV” then the “customize CSV” button.

41
Preparación del LogTag
Preparing the LogTag

42
IMPORTANTE: Asegúrese que el Probe y LogTag tengan el mismo número de serie y código de colores. Inserte el Probe en el LogTag It is very important that the serial numbers on the LogTag and the probe match. There are color-coded dots that will assist you in matching up the LogTag and probe. Once the serial numbers are verified, plug the probe into the LogTag.

43
Coloque el vial en una bandeja de plástico (si la rejilla es de metal) en el centro de la unidad del refrigerador o congelador y asegúrelo con cinta adhesiva o velcro Saque el cable del probe a través de la bisagra de la puerta del refrigerador Permita que el probe/vial se normalice en el refrigerador/ congelador por 1 1/2 a 2 horas antes de iniciar el LogTag Next, place the vial in a plastic tray – if placing it on a wire rack – and put it in the center of the middle rack of the unit and secure with tape or Velcro. Run the probe cable through the hinge side of the door. It is important to be sure and allow the probe/vial to normalize and approximate vaccine temperatures in the unit for 1 ½ - 2 hours before starting the LogTag.

44
Ya el LogTag se encuentra totalmente configurado y listo para usar
Ya el LogTag se encuentra totalmente configurado y listo para usar. Haga clic sobre “OK” y remueva el LogTag de la estación base The LogTag is now fully configured and ready to be used. Click “ok” and remove the LogTag from the docking station. Click the “X” in the upper right corner to close this page. Haga clic sobre “X” en la esquina superior derecha de la página para cerrarla

45
Inserte el LogTag dentro del equipo de soporte SIN el probe adherido
Identifique la localización fuera del refrigerador o congelador donde desea montarlo Asegúrese de que el lugar seleccionado se encuentre al alcance de los probes de los refrigeradores o congeladores y se encuentre fácilmente accesible Adhiera el LTI-MOUNT (plástico transparente de soporte) utilizando la cinta adhesiva de doble contacto (localizada en cada equipo de soporte) Inserte el LogTag dentro del equipo de soporte SIN el probe adherido Decide the desired mounting location on the outside of the unit, ensuring that the probe will reach and that the mounting location of the LogTag is easily accessible. Attach the clear plastic LTI-mount using double-sided tape. Then, slide the LogTag into the mount WITHOUT the probe attached.
 utilizando la cinta adhesiva de doble contacto (localizada en cada equipo de soporte) Inserte el LogTag dentro del equipo de soporte SIN el probe adherido. Decide the desired mounting location on the outside of the unit, ensuring that the probe will reach and that the mounting location of the LogTag is easily accessible. Attach the clear plastic LTI-mount using double-sided tape. Then, slide the LogTag into the mount WITHOUT the probe attached.")
46
Inicio del LogTag This section is about “Starting the LogTag.”

47
Una vez configurado, la pantalla deberá leer “READY”
Presione el botón “START” y manténgalo presionado hasta que “STARTING” deje de parpadear The LogTag is now configured and should read “ready.” Press and hold the “start” button, then release the button when “starting” stops flashing on the screen.

48
Regrese el LogTag al equipo de montaje y conéctele el probe.
Existe una demora de 5 minutos antes de que el LogTag de la unidad de almacenamiento comience a registrar. Regrese el LogTag al equipo de montaje y conéctele el probe. It is important to note that there is a 5 minute delay before the LogTag begins recording. This is a good time to return the LogTag to its holder and plug in the probe.

49
En la pantalla del registrador se debe leer “Recording“
Presione una vez el botón “review” (arriba) El LogTag mostrará la temperatura máxima de ese día (Day 00=fecha actual) On the LogTag display, you will see “recording.” Press the “review” button at the top once. The LogTag will display today’s max temperature.
 El LogTag mostrará la temperatura. máxima de ese día. (Day 00=fecha actual) On the LogTag display, you will see recording. Press the review button at the top once. The LogTag will display today’s max temperature.")
50
Presione “REVIEW” una vez más y la pantalla mostrará la temperatura mínima del día
Una vez que haya terminado de revisar las temperaturas, presione “STOP” una vez To display today’s minimum temperature, press the “review” button once again. When you are done reviewing temperatures, press the “stop” button.

51
Revisión diaria de las estadísticas

52
El LogTag debe todavía mostrar “RECORDING”
Presione “REVIEW” para añadir un “Inspection Mark” al registro Esto muestra que ha revisado las lecturas de temperatura para ese día Dicha acción debe ser realizada dos veces al día para cada LogTag. Esta acción reemplaza la necesidad de mantener registros de temperatura por escrito Puede revisar las temperaturas mínimas y máximas registradas durante los 30 días previos a la fecha actual When reviewing the daily statistics, the LogTag should still show “recording”. By pressing the “review” button you are placing an “inspection mark” on the record. This shows you have reviewed the temperature readings for that day. This should be done twice daily for each LogTag. I need to mention something very important here. When recording an inspection mark right before docking - you MUST hit review, wait 15 minutes, stop it (to where stopped is no longer flashing) before disconnecting the probe and place in the docking station - or your last inspection marks will not record and the LogTag will generate an error message which will prevent it from uploading into Florida SHOTS. Attach the LogTag to the probe BEFORE you hit START (by holding the START button until the word START is no longer flashing and the word STARTED holds steady on the display) to begin taking temperatures again with the LogTag. You are required to keep paper logs and/or temperature readings entered into Florida SHOTS for three years. Once the twice daily temperatures are entered into Florida SHOTS utilizing either a data logger or manual entry methods, going forward – you will not have to maintain the paper logs anymore. Remember that you must have three years of the paper logs or twice daily temperature readings entered into Florida SHOTS – OR a combination of the two. As time passes and temperature readings are entered into Florida SHOTS, you will be able to begin to discard the older paper logs gradually – as you are required to just keep the last 3 years. You can review the minimum and maximum temperatures for up to the previous 30 days recorded.
 before disconnecting the probe and place in the docking station - or your last inspection marks will not record and the LogTag will generate an error message which will prevent it from uploading into Florida SHOTS. Attach the LogTag to the probe BEFORE you hit START (by holding the START button until the word START is no longer flashing and the word STARTED holds steady on the display) to begin taking temperatures again with the LogTag. You are required to keep paper logs and/or temperature readings entered into Florida SHOTS for three years. Once the twice daily temperatures are entered into Florida SHOTS utilizing either a data logger or manual entry methods, going forward – you will not have to maintain the paper logs anymore. Remember that you must have three years of the paper logs or twice daily temperature readings entered into Florida SHOTS – OR a combination of the two. As time passes and temperature readings are entered into Florida SHOTS, you will be able to begin to discard the older paper logs gradually – as you are required to just keep the last 3 years. You can review the minimum and maximum temperatures for up to the previous 30 days recorded.")
53
Una vez que haya revisado las temperaturas mínimas y máximas de la fecha actual, si presiona “REVIEW” una vez más se mostrará la temperatura máxima del día anterior (Day -1). Cualquier lectura fuera de rango será indicada After reviewing the current day’s minimum and maximum temperatures, pressing the “REVIEW” button once again will show yesterday’s (Day -1) maximum temperature. Any out of range readings will be indicated.
 maximum temperature. Any out of range readings will be indicated.")
54
Al presionar nuevamente “REVIEW”, se mostrará la lectura de temperatura mínima del día anterior (Day -1) Then, press “review.”

55
Al presionar “REVIEW” nuevamente se mostrará la lectura máxima de los dos días anteriores a la fecha actual (Day -2) etc… Presione “STOP” en cualquier momento para salir del modo de revisión “REVIEW Mode” By pressing “review” again, the LogTag will display the maximum reading for 2 days ago. You can press the “stop” button at any time to exit “review mode”

56
Como ver y salvar los datos
Extraiga el LogTag del soporte Presione y mantenga presionado el botón “START/CLEAR/STOP Cuando “stopped” deje de parpadear, libere el botón y verá “stopped” en la pantalla Desconecte el probe Es importante que los números de serie del LogTag y el probe coincidan Abra el software LogTag y coloque el LogTag en la estación base To view/save LogTag data – first, slide the LogTag out of the mount. Stop the recording process by pressing and holding the “start/clear/stop button. When “stopped” is no longer flashing, release the button and you should see “stopped” on the screen. Carefully unplug the probe from the LogTag. It is important that the LogTag and probe serial numbers match Open LogTag software and place the LogTag into the docking station

57
Alarmas y Excursiones de Temperatura
Alarms & Temperature Excursions

58
La palabra ALARM comenzará a parpadear en la pantalla del LogTag
Su LogTag ha sido configurado para registrar las temperaturas de una unidad en específico (refrigerador o congelador) Cuando la temperatura registrada se encuentre por encima o por debajo del rango de temperaturas recomendado para la unidad, el LogTag mostrará una advertencia La palabra ALARM comenzará a parpadear en la pantalla del LogTag La flecha hacia arriba indica que la temperatura está muy alta para la unidad La flecha hacia abajo indica que la temperatura está muy baja para la unidad Your LogTag has been configured to record temperatures for a specific unit, either R/F When a recorded temperature is above or below the recommend temperature range for the unit, the LogTag displays an alarm warning The word ALARM flashes on the LogTag’s screen The up arrow indicates the temperature is too warm for the unit A down arrow indicates the temperatures is too cool
 Cuando la temperatura registrada se encuentre por encima o por debajo del rango de temperaturas recomendado para la unidad, el LogTag mostrará una advertencia. La palabra ALARM comenzará a parpadear en la pantalla del LogTag. La flecha hacia arriba indica que la temperatura está muy alta para la unidad. La flecha hacia abajo indica que la temperatura está muy baja para la unidad. Your LogTag has been configured to record temperatures for a specific unit, either R/F. When a recorded temperature is above or below the recommend temperature range for the unit, the LogTag displays an alarm warning. The word ALARM flashes on the LogTag’s screen. The up arrow indicates the temperature is too warm for the unit. A down arrow indicates the temperatures is too cool.")
59
Presione “STOP” hasta que la palabra “ALARM” pare de parpadear
Una vez que la temperatura haya regresado a un rango aceptable podrá borrar el mensaje de alarma Presione “STOP” hasta que la palabra “ALARM” pare de parpadear Libere el botón “STOP” en menos de 2 segundos La palabra “ALARM” deberá desaparecer de la pantalla, sin embargo la palabra “TODAY” aparecerá indicando que ha ocurrido una excursión de temperatura en dicha fecha. Once the temperature has returned to acceptable range, you can clear the alarm Press and hold the STOP button until ALARM stops flashing Release the STOP button within 2 seconds The word ALARM should disappear from the screen, but TODAY will appear, indicating that there was a temperature excursion today

60
Al día siguiente, aparecerá el mensaje “-1 day” indicando que la alarma fue activada el día anterior
Tomorrow, there will be a message showing “1-day”, indicating that there was an alarm yesterday

61
Este mensaje se continuará mostrando por 30 días, indicando todas las veces que la alarma fue activada durante ese periodo de tiempo (en el siguiente ejemplo, la alarma se activó varias veces en varios de los días anteriores: el día anterior (-1day), 8, 20, 21 y 26 días anteriores) This message will continue to show for up to 30 days, indicating all the alarms that occurred during that 30-day time period. (In this below, there were several alarms that occurred: yesterday (1-day), 8 days ago, 20 days ago, 21 days ago and 26 days ago
, 8 days ago, 20 days ago, 21 days ago and 26 days ago.")
62
El valor mostrado indica lo siguiente :
TIME = Muestra el tiempo actual (READY & RECORDING modes) TIME DELAY = Muestra el tiempo que queda para comenzar los registros una vez que el tiempo “DELAYED START” haya sido configurado (STARTING MODE) The value displayed is indicated by the following: TIME = Displaying Current Time (READY & RECORDING modes) TIME DELAY = Displaying remaining time to recording start when a DELAYED START time has been configured (STARTING MODE)
 TIME DELAY = Muestra el tiempo que queda para comenzar los registros una vez que el tiempo DELAYED START haya sido configurado (STARTING MODE) The value displayed is indicated by the following: TIME = Displaying Current Time (READY & RECORDING modes) TIME DELAY = Displaying remaining time to recording start when a DELAYED START time has been configured (STARTING MODE)")
63
Estado de la batería– Muestra el estado de la batería cada una hora
DURATION = Muestra la duración de una estadística MAX/MIN dada por encima/debajo del límite en un día determinado Estado de la batería– Muestra el estado de la batería cada una hora DURATION = Displaying duration of a given MAX/MIN statistic above/below the limits in a given day (REVIEW MODE) Battery status – Performs battery test hourly
 Battery status – Performs battery test hourly.")
64
Cuando el LogTag es insertado en la estación base los datos son automáticamente descargados y salvados en la computadora El gráfico que muestra el periodo de tiempo en el que el LogTag estuvo activado, se muestra por defecto Se indican los registros desde 26/9/14 hasta 1/10/14 When the LogTag is inserted into the dock it’s data is automatically downloaded and saved to your computer By default, a chart is displayed showing the time period that the LogTag was active

65
El rango de temperatura se muestra en el eje de la izquierda
La línea azul grafica todas las temperaturas registradas durante este periodo El rango de temperatura se muestra en el eje de la izquierda La fechas y hora se muestra en el eje x Si se para con el ratón sobre cualquier punto del gráfico podrá ver el tiempo y la temperatura registrada para dicho punto Puede cambiar la pantalla haciendo clic sobre una de las pestañas en la parte inferior. La pestaña mostrada en la imagen corresponde a “CHART” The blue line is charting all of the recorded temperatures during this period The temperature range is shown on the left Times and dates are along the bottom You can hover with your mouse over any point on the graph to see the time and temperature recorded

66
Si hace clic sobre “REPORT” podrá ver el reporte que resume toda la información para este periodo
Al hacer clic sobre “DATA”, se mostrará un reporte detallado de cada lectura de temperatura registrada Los valores de temperatura registrados cada 15 minutos se muestran en el reporte como pre-set en el LogTag If you click on “REPORT” you will see a one-page report that summarizes all of the information for this time period. Clicking “DATA” will give you a detailed report of each recorded temperature reading The temperature captured every 15 minutes is shown in this report as pre-set in the LogTag

67
El resumen de las estadísticas diarias se muestra al hacer clic sobre “DAY SUMMARY”
En el caso de una excursión, este reporte le ayudará a determinar el periodo de tiempo en que las temperaturas se mantuvieron fuera del rango, mostrando la temperatura más alta y la más baja alcanzadas Clicking on “DAY SUMMARY” summarizes the daily statistics In the case of an excursion, this report will help to determine the amount of time that temperatures were out of range showing the highest and lowest temperature reached

68
Solución de problemas Trouble-shooting the LogTag

69
Lecturas de temperatura de -199 grados
Podría ver esto en la pantalla si el LogTag ha sido iniciado pero no conectado al probe en un plazo de 5 minutos Pare el LogTag y desconecte el probe Inicie el software en su computadora, coloque el LogTag en la estación y haga clic sobre el icono Configuration Wizard para reiniciar el LogTag Cuando haya terminado, inicie el LogTag y conéctelo al probe antes de que pasen los 5 minutos del plazo de tiempo de demora -199 Degrees Temperature Readings - You may see this on your display if the LogTag has been started but not attached to the probe within the 5 minutes start delay Stop the LogTag and unplug the probe Open the software on your computer, place the LogTag in the dock and click on the Configuration Wizard icon to reset the LogTag When finished, start the LogTag and attach it to the probe within the 5 minute delay time frame

70
Si no sucede nada cuando el LogTag sea insertado en la estación:
Remueva el LogTag de la estación, inicie el software LogTag Analyzer, y luego recoloque el LogTag en la estación Si el LogTag no es encontrado: Cierre esta ventana, y luego reinserte el LogTag hasta que escuche un clic If nothing happens when the LogTag is inserted into the dock: Remove the LogTag from the dock, open the LogTag Analyzer software, then replace the LogTag in the dock If the LogTag is not found: Close this window, then reinsert the LogTag until it clicks

71
Apoyo adicional Additional Support

72
Instrucciones detalladas sobre el uso del LogTag y el software podrán ser encontradas en el Manual del LogTag Analyzer El manual puede encontrarlo al hacer clic sobre la opción “HELP” en el Software LogTag Analyzer El soporte técnico se encuentra a su disposición en MicroDAQ.com, Ltd. También de lunes a viernes de 9:30AM a 4:30 PM, hora del este, mediante el teléfono o el correo electrónico Detailed instructions on using the LogTag and its’ software can be found in the LogTag Analyzer Manual The manual can be found by clicking on the “HELP” option from inside the LogTag Analyzer Software Technical support is available from MicroDAQ.com, Ltd. Monday – Friday from 9:30AM – 4:30 PM EST by calling or by at:

Presentaciones similares


 Noviembre de 2004.>")


