Descargar la presentación
La descarga está en progreso. Por favor, espere

1
(Láminas de preparación – 1)
EXAMEN HISTOLOGÍA (Láminas de preparación – 1)
")
2
Responde completamente y por escrito a las preguntas. ¡ENSAYA!
Metodología 1 Observa la lámina con atención. Luego pasa a la siguiente que contiene las preguntas. 2 Responde completamente y por escrito a las preguntas. ¡ENSAYA! 3 Pasa a la tercera diapositiva en la que tendrás las respuestas. Corrije errores y amplía información. Animated SmartArt vertical list Under SmartArt Tools, on the Format tab, in the WordArt Styles group, click the arrow to the right of Text Effects, then point to Shadow, and under Outer, click Offset Diagonal Bottom Right. (Intermediate) To reproduce the animation effects on this slide, do the following: To reproduce the SmartArt effects on this slide, do the following: On the Animation tab, in the Animation group, click Animation Pane. On the Home tab, in the Slides group, click Layout, and then click Blank. Select the SmartArt graphic, and then on the Animations tab, in the Animation group, click the More arrow at the Effects Gallery and click More Effects. In the Change Entrance Effect dialog box, under Exciting select Curve Up, and click OK. On the Insert tab, in the Illustrations group, click SmartArt. In the Choose a SmartArt Graphic dialog box, in the left pane, click List. In the List pane, click Vertical Block List (sixth row, first option from the left), and then click OK to insert the graphic into the slide. In the Animation group, click Effect Options, and under Sequence, click One by One. Select the graphic, and then click one of the arrows on the left border. In the Type your text here dialog box, enter text for each of the rectangles. In the Timing group, do the following: On the Timing tab, in the Start list, select After Previous. Press and hold CTRL, and select each of the second-level rectangles on the slide. Drag the left sizing handle of one of the second-level rectangles to the left 0.5” to increase the width of the second-level rectangles. Note: The first-level rectangles (rounded rectangles) will decrease in width at the same time. On the Timing tab, in the Duration list, select In the Animation Pane, click the double arrow under the curve up entrance effect (first effect) to expand the list of effects. Press and hold CTRL, and select the second, fourth, and sixth effects (curve up entrance effects). On the Animations tab, in the Animation group, click the More arrow at the Effects Gallery and click More Entrance Effects. In the Change Entrance Effect dialog box, under Basic, select Peek In, and click OK. Select the SmartArt graphic. Under SmartArt Tools, on the Design tab, in the SmartArt Styles group, click the More arrow at the SmartArt Styles gallery, and under Best Match for Document select Intense Effect (fifth option from the left). Press and hold CTRL, and then select each of the first-level rectangles (rounded rectangles) in the SmartArt graphic. In the Animation group, click Effect Options, and under Direction, click From Top. Under SmartArt Tools, on the Format tab, in the WordArt Styles group, click the arrow to the right of Text Fill, and under Theme Colors select White, Background 1, Darker 25%. (fourth row, first option from the left). In the Start list, select With Previous. In the Duration list, select Under SmartArt Tools, on the Format tab, in the Shape Styles group, click the arrow to the right of Shape Fill and under Theme Colors select White, Background 1 (first row, first option from the left). To reproduce the background effects on this slide, do the following: Right-click the slide background, and then click Format Background. Select the top, second-level rectangle in the SmartArt graphic. In the Format Background dialog box, click Fill in the left pane, select Gradient fill in the Fill pane, and then do the following: Under SmartArt Tools, on the Format tab, in the Shape Styles group, click the arrow to the right of Shape Fill and under Theme Colors select Olive Green, Accent 3. (first row, seventh option from the left). In the Type list, select Radial. In the Direction list, click From Center (third option from the left). Select the center, second-level rectangle in the SmartArt graphic. Under Gradient stops, click Add gradient stop or Remove gradient stop until two stops appear on the slider, then customize the gradient stops as follows: Under SmartArt Tools, on the Format tab, in the Shape Styles group, click the arrow to the right of Shape Fill and under Theme Colors select Olive Green, Accent 3, Lighter 40% (fourth row, seventh option from the left). Select the first stop on the slider, and then do the following: In the Position box, enter 33%. Select bottom, second-level rectangle in the SmartArt graphic. Click the button next to Color, and then under Theme Colors click White, Background 1 (first row, the first option from the left). Under SmartArt Tools, on the Format tab, in the Shape Styles group, click the arrow to the right of Shape Fill and under Theme Colors select Olive Green, Accent 3, Lighter 60% (third row, seventh option from the left). Select the last stop on the slider, and then do the following: Press and hold CTRL, and select each of the second-level rectangles. In the Position box, enter 100%. On the Home tab, in the Font group, in the Font Color list select White, Background 1 (first row, first option from the left). Click the button next to Color, and then under Theme Colors click White, Background 1, Darker 15% (third row, first option from the left).
 To reproduce the animation effects on this slide, do the following: To reproduce the SmartArt effects on this slide, do the following: On the Animation tab, in the Animation group, click Animation Pane. On the Home tab, in the Slides group, click Layout, and then click Blank. Select the SmartArt graphic, and then on the Animations tab, in the Animation group, click the More arrow at the Effects Gallery and click More Effects. In the Change Entrance Effect dialog box, under Exciting select Curve Up, and click OK. On the Insert tab, in the Illustrations group, click SmartArt. In the Choose a SmartArt Graphic dialog box, in the left pane, click List. In the List pane, click Vertical Block List (sixth row, first option from the left), and then click OK to insert the graphic into the slide. In the Animation group, click Effect Options, and under Sequence, click One by One. Select the graphic, and then click one of the arrows on the left border. In the Type your text here dialog box, enter text for each of the rectangles. In the Timing group, do the following: On the Timing tab, in the Start list, select After Previous. Press and hold CTRL, and select each of the second-level rectangles on the slide. Drag the left sizing handle of one of the second-level rectangles to the left 0.5 to increase the width of the second-level rectangles. Note: The first-level rectangles (rounded rectangles) will decrease in width at the same time. On the Timing tab, in the Duration list, select In the Animation Pane, click the double arrow under the curve up entrance effect (first effect) to expand the list of effects. Press and hold CTRL, and select the second, fourth, and sixth effects (curve up entrance effects). On the Animations tab, in the Animation group, click the More arrow at the Effects Gallery and click More Entrance Effects. In the Change Entrance Effect dialog box, under Basic, select Peek In, and click OK. Select the SmartArt graphic. Under SmartArt Tools, on the Design tab, in the SmartArt Styles group, click the More arrow at the SmartArt Styles gallery, and under Best Match for Document select Intense Effect (fifth option from the left). Press and hold CTRL, and then select each of the first-level rectangles (rounded rectangles) in the SmartArt graphic. In the Animation group, click Effect Options, and under Direction, click From Top. Under SmartArt Tools, on the Format tab, in the WordArt Styles group, click the arrow to the right of Text Fill, and under Theme Colors select White, Background 1, Darker 25%. (fourth row, first option from the left). In the Start list, select With Previous. In the Duration list, select Under SmartArt Tools, on the Format tab, in the Shape Styles group, click the arrow to the right of Shape Fill and under Theme Colors select White, Background 1 (first row, first option from the left). To reproduce the background effects on this slide, do the following: Right-click the slide background, and then click Format Background. Select the top, second-level rectangle in the SmartArt graphic. In the Format Background dialog box, click Fill in the left pane, select Gradient fill in the Fill pane, and then do the following: Under SmartArt Tools, on the Format tab, in the Shape Styles group, click the arrow to the right of Shape Fill and under Theme Colors select Olive Green, Accent 3. (first row, seventh option from the left). In the Type list, select Radial. In the Direction list, click From Center (third option from the left). Select the center, second-level rectangle in the SmartArt graphic. Under Gradient stops, click Add gradient stop or Remove gradient stop until two stops appear on the slider, then customize the gradient stops as follows: Under SmartArt Tools, on the Format tab, in the Shape Styles group, click the arrow to the right of Shape Fill and under Theme Colors select Olive Green, Accent 3, Lighter 40% (fourth row, seventh option from the left). Select the first stop on the slider, and then do the following: In the Position box, enter 33%. Select bottom, second-level rectangle in the SmartArt graphic. Click the button next to Color, and then under Theme Colors click White, Background 1 (first row, the first option from the left). Under SmartArt Tools, on the Format tab, in the Shape Styles group, click the arrow to the right of Shape Fill and under Theme Colors select Olive Green, Accent 3, Lighter 60% (third row, seventh option from the left). Select the last stop on the slider, and then do the following: Press and hold CTRL, and select each of the second-level rectangles. In the Position box, enter 100%. On the Home tab, in the Font group, in the Font Color list select White, Background 1 (first row, first option from the left). Click the button next to Color, and then under Theme Colors click White, Background 1, Darker 15% (third row, first option from the left).")
3
1 2 3 1 4
4
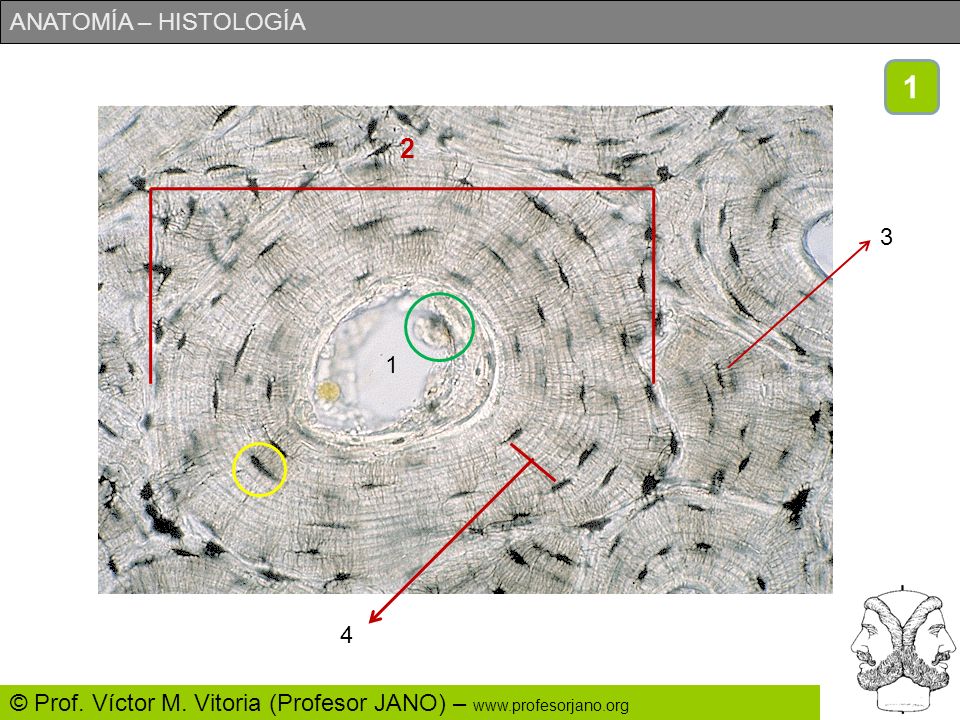
Identifica lo más precisamente posible el tejido aquí representado.
¿Qué es el nº1 y que habría en su interior?. ¿Qué célula podría ser la incluida en el círculo verde?. ¿Cuál es su función?. ¿Qué nombre recibe 2? ¿Qué está señalado con el círculo amarillo. ¿Qué señala el nº 3 y cuál es su misión). ¿Qué es el nº 4?. ¿Cuál es su composición química?
. ¿Qué es el nº 4 . ¿Cuál es su composición química")
5
Se trata de un tejido óseo compacto.
Conducto de Havers. Por su interior circularía un vaso sanguíneo. Se trataría de un OSTEOBLASTO. Su función es sintetizar hueso. Es una OSTEONA o SISTEMA DE HAVERS. Es una laguna ósea con un osteocito en su interior. Son canalículos y su misión es comunicar las lagunas óseas entre sí. Se trata de una laminilla ósea y su composición es la sustancia intercelular ósea: matriz, fibras de colágeno y sales de calcio (hidroxiapatito) y magnesio que la mineralizan.
 y magnesio que la mineralizan.")
6
2

7
Identifica lo más precisamente posible el tejido.
¿Qué función específica tiene? ¿Qué tipos de este tejido conoces?. ¿Dónde se pueden localizar? ¿A qué corresponden los círculos verdes? ¿Qué nombre recibe lo incluido en el círculo rojo?. ¿Cuál es su misión?

8
Se trata de un epitelio plano monoestratificado.
Permitir el transporte de sustancias a su través y el deslizamiento de las estructuras que recubre. Endotelio (recubriendo cavidades del sistema circulatorio) y Mesotelio que forma parte de las peritoeno, pleura y pericardio. Son los núcleos de las células. Son interdigitaciones. Favorecen la unión entre las células
 y Mesotelio que forma parte de las peritoeno, pleura y pericardio. Son los núcleos de las células. Son interdigitaciones. Favorecen la unión entre las células.")
9
3 (3) (1) (2)
 (1) (2)")
10
Identifica lo más precisamente posible el tejido nº 1
Identifica lo más precisamente posible el tejido nº 1. ¿dónde se puede localizar?. ¿A qué corresponde la estructura nº 3?. ¿Cuál es su misión? ¿Qué está señalado en el recuadro?. ¿Cuál es su composición?. ¿Qué es el nº 2?. ¿Qué relación tiene con el nº 1?

11
Se trata de un epitelio pseudoestratificado ciliado
Se trata de un epitelio pseudoestratificado ciliado. Se encuentra recubriendo las vías respiratorias. También las genito-urinarias. Son cilios. Su misión es la de transportar sustancias por la superficie y protección. Es la membrana basal. Contiene, sobre todo, fibras de colágeno. Es tejido conjuntivo y desde los vasos sanguíneos difunden gases y nutrientes al epitelio que es avascular. También recoge los productos de desecho y CO2 del epitelio.

12
4

13
Identifica lo más precisamente posible este tejido.
¿Cómo se nutre?. ¿Qué pasa si no le llega suficiente oxigeno? Identifica cada uno de los números y explica las consecuencias que tiene para este tejido el nº 3. ¿Qué es lo más abundante que hay en las células de éste tejido?

14
Se trata del miocardio y se localiza en el corazón.
Se nutre gracias a los abundantes vasos sanguíneos que contiene. La anoxia supone la muerte de zonas del miocardio o infarto. (1) – Células ; (2)- Núcleo de células miocárdicas. ; (3) – Discos intercalares. Producen que el miocardio actúe como una unidad fisiológica (“todas las células como una”) En su interior hay abundantes filamentos de actina y miosina.
 – Células ; (2)- Núcleo de células miocárdicas. ; (3) – Discos intercalares. Producen que el miocardio actúe como una unidad fisiológica ( todas las células como una ) En su interior hay abundantes filamentos de actina y miosina.")
15
5 (3) (2) (1)
 (2) (1)")
16
(a): Identifica lo más precisamente posible este tejido.
(b): ¿Cuál es la célula más representativa de este tejido? ¿Qué otras células se podrían encontrar? (c): ¿A qué corresponde lo incluido en el círculo? (d): ¿Qué es el nº 2 y su composición? (e): (1) – Fibras de elastina; (3)- Fibras de colágeno. Las fabrica el fibroblastos.
: ¿Cuál es la célula más representativa de este tejido ¿Qué otras células se podrían encontrar (c): ¿A qué corresponde lo incluido en el círculo (d): ¿Qué es el nº 2 y su composición (e): (1) – Fibras de elastina; (3)- Fibras de colágeno. Las fabrica el fibroblastos.")
17
(a): Tejido conjuntivo fibroso laxo
(b): El fibroblasto. También se pueden encontrar células exógenas como linfocitos, macrófagos, amstocitos. Tb. adipocitos sueltos. (c): Es un núcleo, posiblemente de fibroblasto. (d): Es la matriz y contiene glucosaminoglucanos, compuestos azufrados y sustancias provenientes de la sangre, nutrientes, agua, iones, etc. (e): ¿A qué corresponde los números 1 y 3?. ¿Quién los fabrica?
: El fibroblasto. También se pueden encontrar células exógenas como linfocitos, macrófagos, amstocitos. Tb. adipocitos sueltos. (c): Es un núcleo, posiblemente de fibroblasto. (d): Es la matriz y contiene glucosaminoglucanos, compuestos azufrados y sustancias provenientes de la sangre, nutrientes, agua, iones, etc. (e): ¿A qué corresponde los números 1 y 3 . ¿Quién los fabrica")
18
(2) (1)
 (1)")
19
6 a) Identifica lo más precisamente posible el tejido nº 2. ¿Cuál es su misión? b) ¿Qué puede ser el nº 1? c) ¿Dónde podría encontrarse esta diapositiva?
 ¿Dónde podría encontrarse esta diapositiva")
20
a) Se trata de un epitelio cúbico simple
a) Se trata de un epitelio cúbico simple. Su función es elr evestimiento. b) Es un túbulo. c) Puede ser un conducto glandular o también alguna zona del túbulo de la nefrona en el riñón.
 Se trata de un epitelio cúbico simple. Su función es elr evestimiento. b) Es un túbulo. c) Puede ser un conducto glandular o también alguna zona del túbulo de la nefrona en el riñón.")
Presentaciones similares


>")


